Introduction to Gestures:
Note: In this section you won't be applying this code into a project, this is just an introduction getting you used to the idea of gestures in iOS development.
So we've just finished covering drawing in a UIView, but how do we get input from the user in the form of touches? iOS has an abstraction for the raw touch input data called gestures, which allows developers to view their application as if they are a user. Users interact with your application through swipes, pinches, pans etc - these are the kinds of gestures we will be talking about.
Gestures are detected through instances of UIGestureRecognizer, which is an abstract class. This means that we don't instantiate a UIGestureRecognizer itself, but one of it's concrete subclasses. There are two parts to using a gesture recognizer. The first is to add the gesture recognizer to a UIView that needs to recognize that gesture. The second part involves writing a function (a gesture handler) to handle the gesture once it has been recognized.
The first part of adding a gesture recognizer to a UIView is usually done by a controller, but can also be done by the UIView itself. A useful example for the latter case is a UIScrollView that would require a pan gesture recognizer. The second part of the gesture handler can be implemented in either the view or the controller depending on the situation. If the handler is going to have to modify the model, then it would be best to implement it in the controller. However, if the handler is to only modify the view, then it would be better to have the handler implemented in the view.
The best place for the controller to add a gesture recognizer to a view is in the didSet of the outlet. This is shown below.
@IBOutlet weak var pannableView: UIView {
	didSet {
		let recognizer = UIPanGestureRecognizer(
			target: self, action: #selector(ViewController.pan(_:))
		)
		pannableView.addGestureRecognizer(recognizer)
	}
}
There are a few things to note in the code snippet above. The target parameter is set to 'self', which is referring to the current class this code is in, which is the controller. Essentially, the target is saying what class is going to handle the recognition of the gesture. The second argument is saying what function to invoke in the target when a gesture is recognized. The #selector shouldn't be something you have to worry about as long as the target is inheriting from NSObject, which controllers and views do. The underscore in the argument names, says to ignore the first argument name, basically saying we don't care about its name. The thing we do care about is the method name and how many arguments, in this case 1.
Now let's talk about implementing the gesture handler. Each concrete gesture recogniser has gesture-specific information, which we can access in our handlers. In the above code snippet, the first argument si actually the UIPanGestureRecognizer itself that we are passing to the handler. Below are three methods provided by UIPanGestureRecognizer.
func translationInView(UIView) -> CGPoint // cumulative since start of recognition
func velocityInView(UIView) -> CGPoint // how fast finger is moving (points/s)
func setTranslation(CGPoint, inView: UIView) // allows us to reset to 0, and get incremental translations instead of cumulative.
The abstract superclass has useful 'state' information including the state of the finite automaton used to recognise the gesture. The states include .Possible, .Recognized, .Began, .Changed, .Ended, .Failed, .Cancelled (An incoming phone call may cancel a gesture)
var state: UIGestureRecognizerState { get }
What would the implemented gesture handler then look like?
func pan(gesture: UIPanGestureRecognizer) {
	switch gesture.state {
		case .Changed: fallthrough
		case .Ended:
			let translation = gesture.translationInView(pannableView)
			// insert code here that will react to the panning
			gesture.setTranslation(CGPointZero, inView: pannableView) // resetting translation so we can get incremental values.
		default:
			break
	}
}
A UIPinchGestureRecognizer will provide us with different information, specific to a pinch such as a variable telling us the scale at which we pinched and a variable called velocity telling us how fast we pinched.
Adding gestures to FaceIt:
First we will add a pinch gesture recognizer to our FaceView to allow the user to scale the face by pinching. As this will not be modifying the model - the model doesn't have a way of representing size - the gesture can be added by the controller and the handler can be implemented in FaceView itself.
// inside the controller
@IBOutlet weak var faceView: FaceView! {
	didSet {
		faceView.addGestureRecognizer(UIPinchGestureRecognizer(
			target: faceView, action: #selector(FaceView.changeScale(_:))
		))
		updateUI()
	}
}

// inside FaceView
func changeScale(recognizer: UIPinchGestureRecognizer) {
        switch recognizer.state {
        case .Changed, .Ended:
            scale *= recognizer.scale
            recognizer.scale = 1.0
        default:
            break
        }
    }
Adding the gesture recognizer is exactly how we described in the introduction, except we are saying that the handler is implemented in FaceView instead of in the controller. The handler will only make changes while the user is pinching, and finally when the user has finished. The handler also resets the recognizer's scale variable so that we get incremental updates on the scale instead of a multiplicative values. Also note that changeScale is a public function as we need to refer to it from the controller.
We can now test whether we have the pinch gesture setup correctly. In my opinion, getting your first gesture to work is a wonderful feeling, because gestures are a huge part of iOS. Tip: For those running on a simulator, you can simulate a pinch gesture by holding down the option button.
Now we will take a look at adding some gestures that will be affecting the model, and so the gesture handler should be implemented in the controller as opposed to the view. First we will add a swipe gesture for making the face smile 'more' when swiping up.
// inside the FaceViewController
@IBOutlet weak war faceView: FaceView! {
	didSet {
		...
		let happierSwipeGestureRecognizer = UISwipeGestureRecognizer(
			target: self, action: #selector(FaceViewController.increaseHappiness)
		)
		happierSwipeGestureRecognizer.direction = .Up
		faceView.addGestureRecognizer(happierSwipeGestureRecognizer)
	}
}

func increaseHappiness() {
	facialExpression.mouth = facialExpression.mouth.happierMouth()
}
Again, we create the gesture recognizer and add it to the FaceView in the controller. In contrast to the PinchGestureRecognizer, it would be less readable to have everything done on one line. Instead, we create the gesture recognizer as a constant (as we aren't going to be changing it's reference), then set the direction of swipes it will be recognizing, and finally adding the gesture recognizer to the FaceView. The gesture handler is also implemented in the controller, as noted above, and it simply calls into a method in the model that will update the model, consequently calling updateUI() because the facialExpression variable has been modified.
Rerun the application and make sure that swiping up causes the face to smile 'more'. Now try to make a gesture recognizer for downward swipes that will cause the face to frown 'more'. The code should be fairly similar to what we have just implemented. If you are having any trouble you can always look below:
// inside the FaceViewController
@IBOutlet weak war faceView: FaceView! {
	didSet {
		...
		let sadderSwipeGestureRecognizer = UISwipeGestureRecognizer(
			target: self, action: #selector(FaceViewController.decreaseHappiness)
		)
		sadderSwipeGestureRecognizer.direction = .Down
		faceView.addGestureRecognizer(sadderSwipeGestureRecognizer)
	}
}

func decreaseHappiness() {
	facialExpression.mouth = facialExpression.mouth.sadderMouth()
}
Again ensure that these new gestures are working, even the old ones as a small typo in a newly created/added gesture may affect previous ones - especially in a scenario such as this where the code is quite similar! Once we get to a stage where we are writing unit tests, however, these situations can be avoided.
We will now add a tap gesture recognizer that will control whether the eyes are open or closed. However, instead of adding the gesture recognizers to the FaceView through code in the controller, we will try something a little different - through the storyboard.
To start this, we need to have side-by-side view open (the venn diagram button) where we can see the FaceViewController and the storyboard at the same time. We also need to have access to the righthand pane, so show it if it is currently hidden. We will add a UITapGestureRecognizer to the view by dragging it out of the UI palette in the bottom right corner of the right-hand pane, and into the FaceView in the storyboard. This will add a small icon on the top bar of the storyboard, that once clicked will show us information about the gesture recognizer in the attributes inspector, such as the number of taps to detect. See Figure 1.
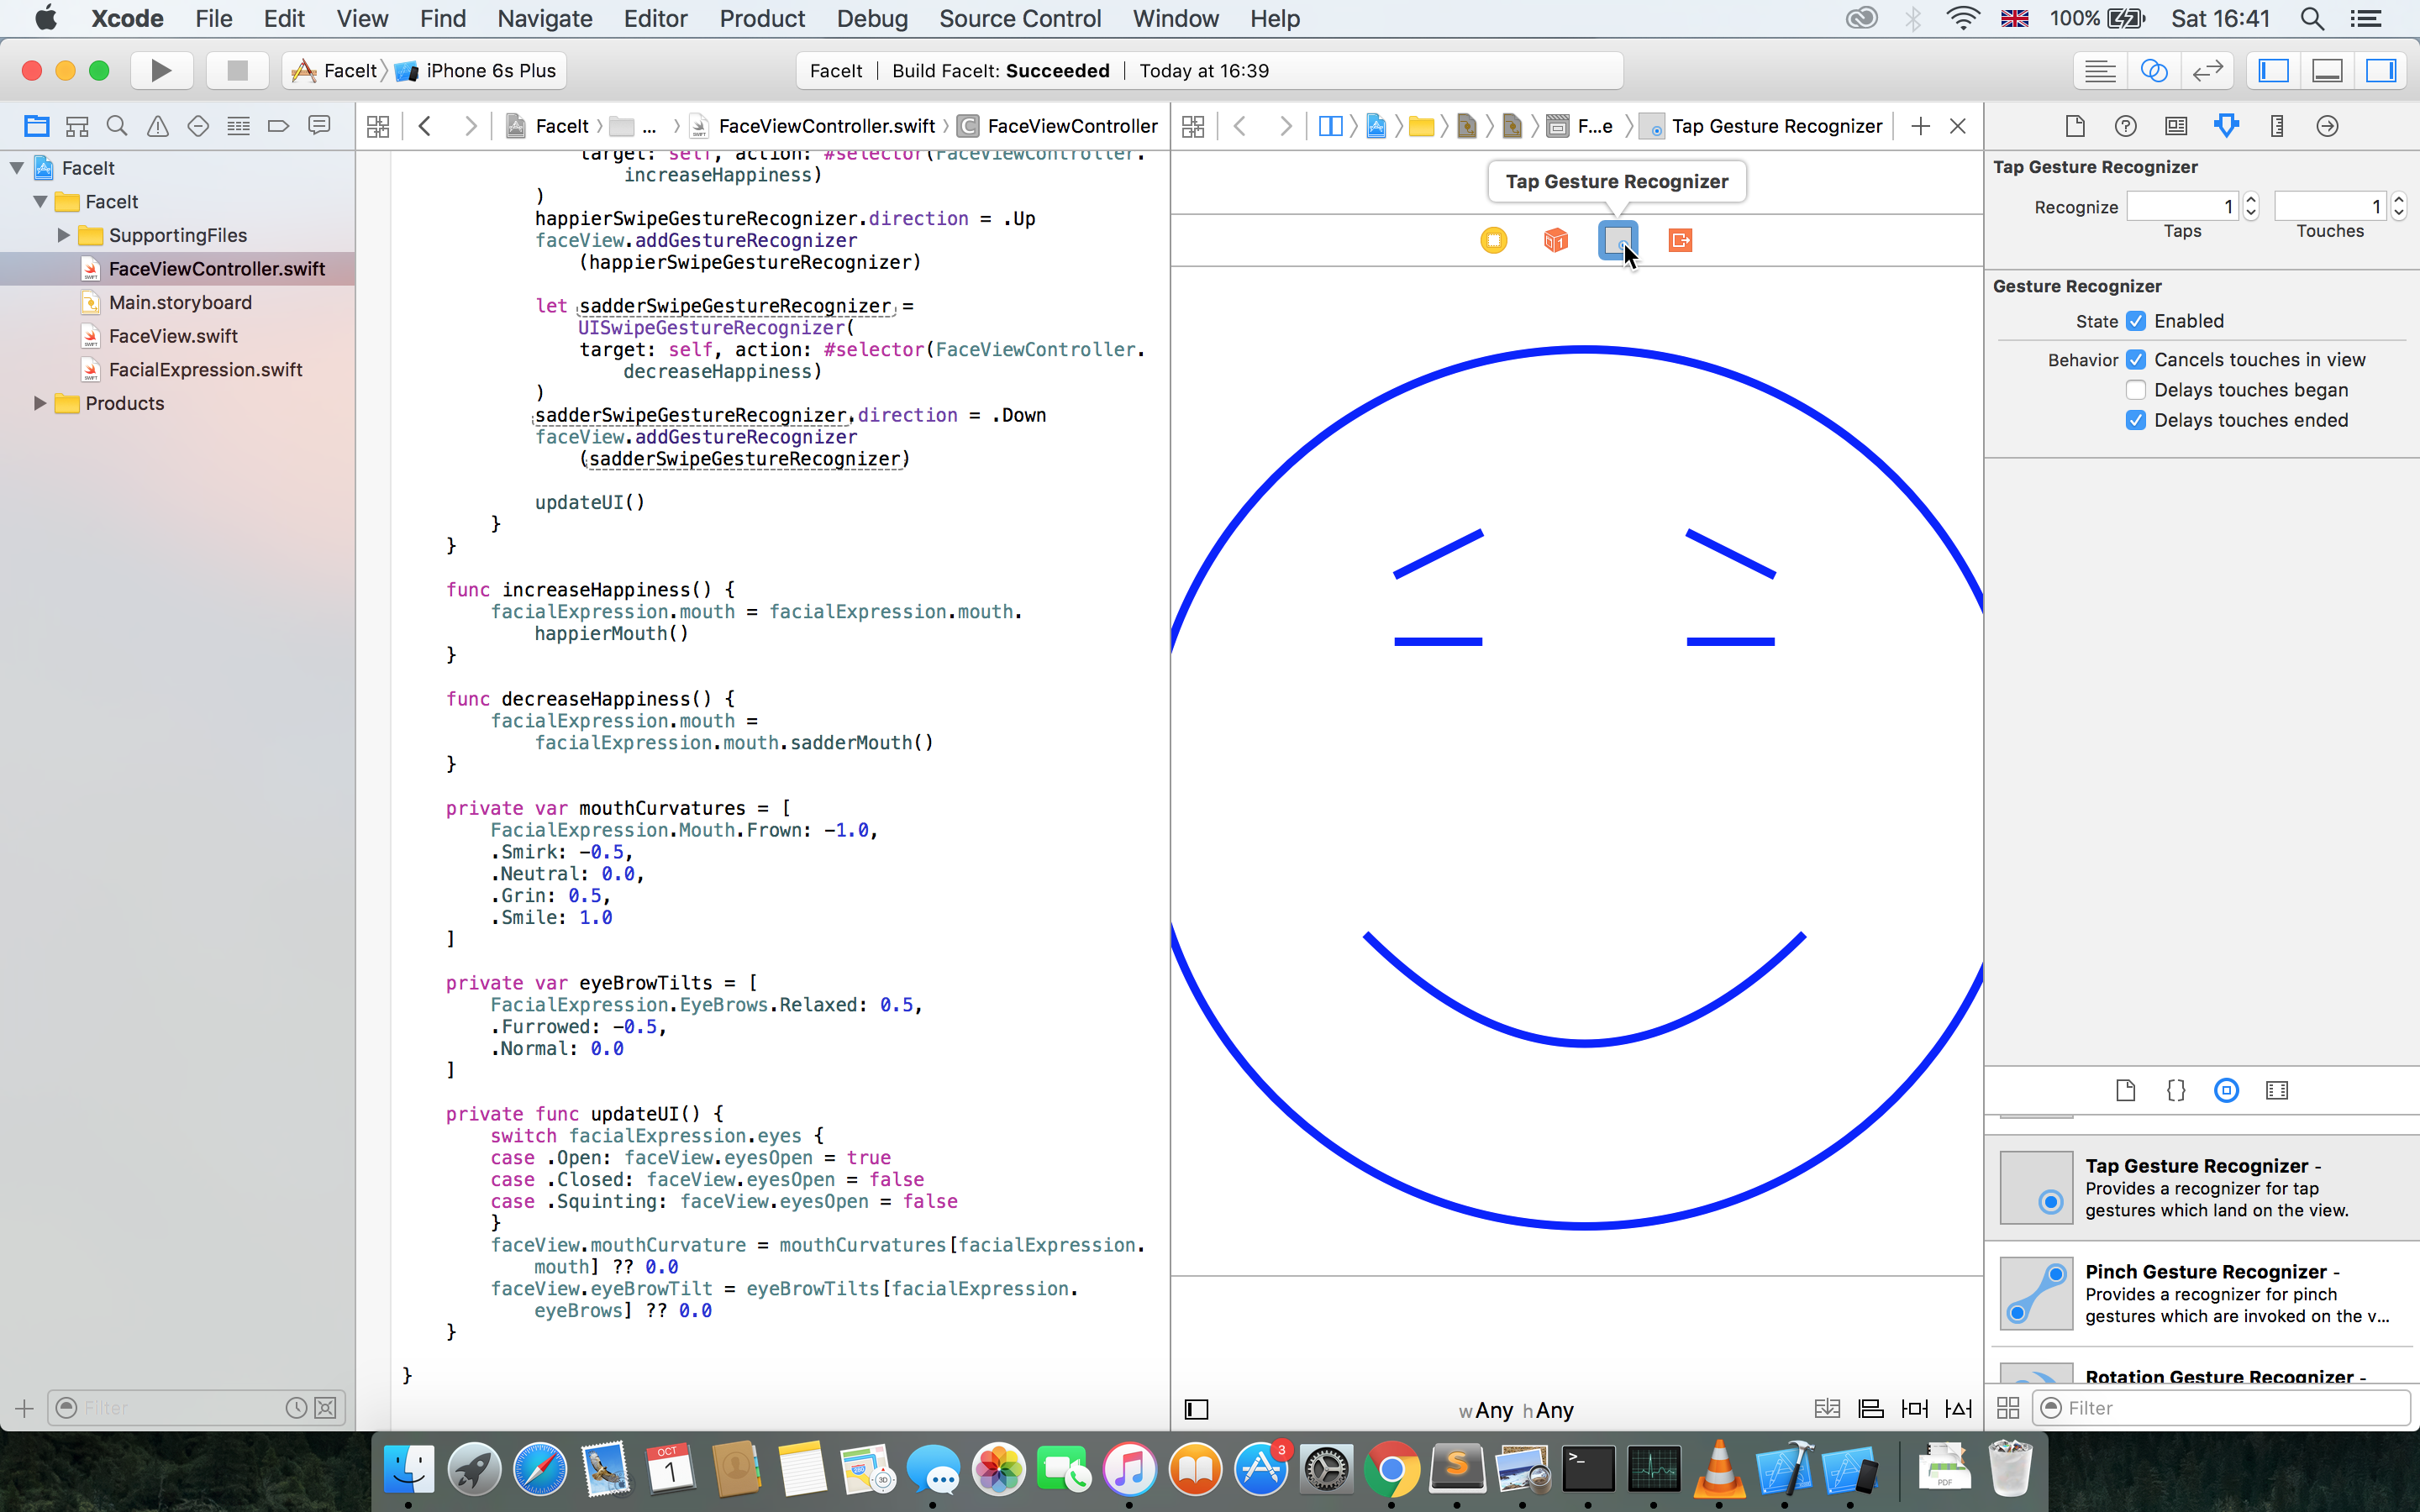 Figure 1: Adding a gesture recognizer to the storyboard.
We can then create an action through the funky alt-click-drag of the icon in the storyboard to the controller. This action can be the gesture handler.
@IBAction func toggleEyes(recognizer: UITapGestureRecognizer) {
	if recognizer.state == .Ended {
		switch facialExpression.eyes {
		case .Open: facialExpression.eyes = .Closed
		case .Closed: facialExpression.eyes = .Open
		case .Squinting: facialExpression.eyes = break
		}
	}
}
We renamed the default internal name of the argument from sender to recognizer. This handler switches on the current value of the facialExpression's eyes. However, we don't yet know how to handle the squinting case, so we can just break on that case. Again, rerun the application and check if all the gestures are working. Notice how this way led to less writing of code because dragging the UITapGestureRecognizer from the UIPalette prevented the need to type out a few lines of code.
That conclude's this episode of adding gesture recognizers to an iOS application.