Adding a Pi button:
Let's begin this episode by adding mathematical symbols to our calculator, beginning with the π button. However, we can't use the touchDigit function for the π button because the button won't have the π value on it. It would be cumbersome for us to catch this case separately in the function for two reasons - 1) we have other mathematical symbols to catch as well and 2) less technical, we have named the function touchDigit and so it wouldn't make sense for us to be dealing with the π button here.
So should we copy-paste a button that we have to create this π button? Think about this... if we did this, then we would have the design of the button copied as well as any associated actions. However, as we said above we do not want the π button to be associated with the touchDigit function. To remove the association you can right click the newly pasted button and click on the cross next to the association link. See Figure 1. Remember to change the text inside the button to a π button. Tip: alt-p for π character.
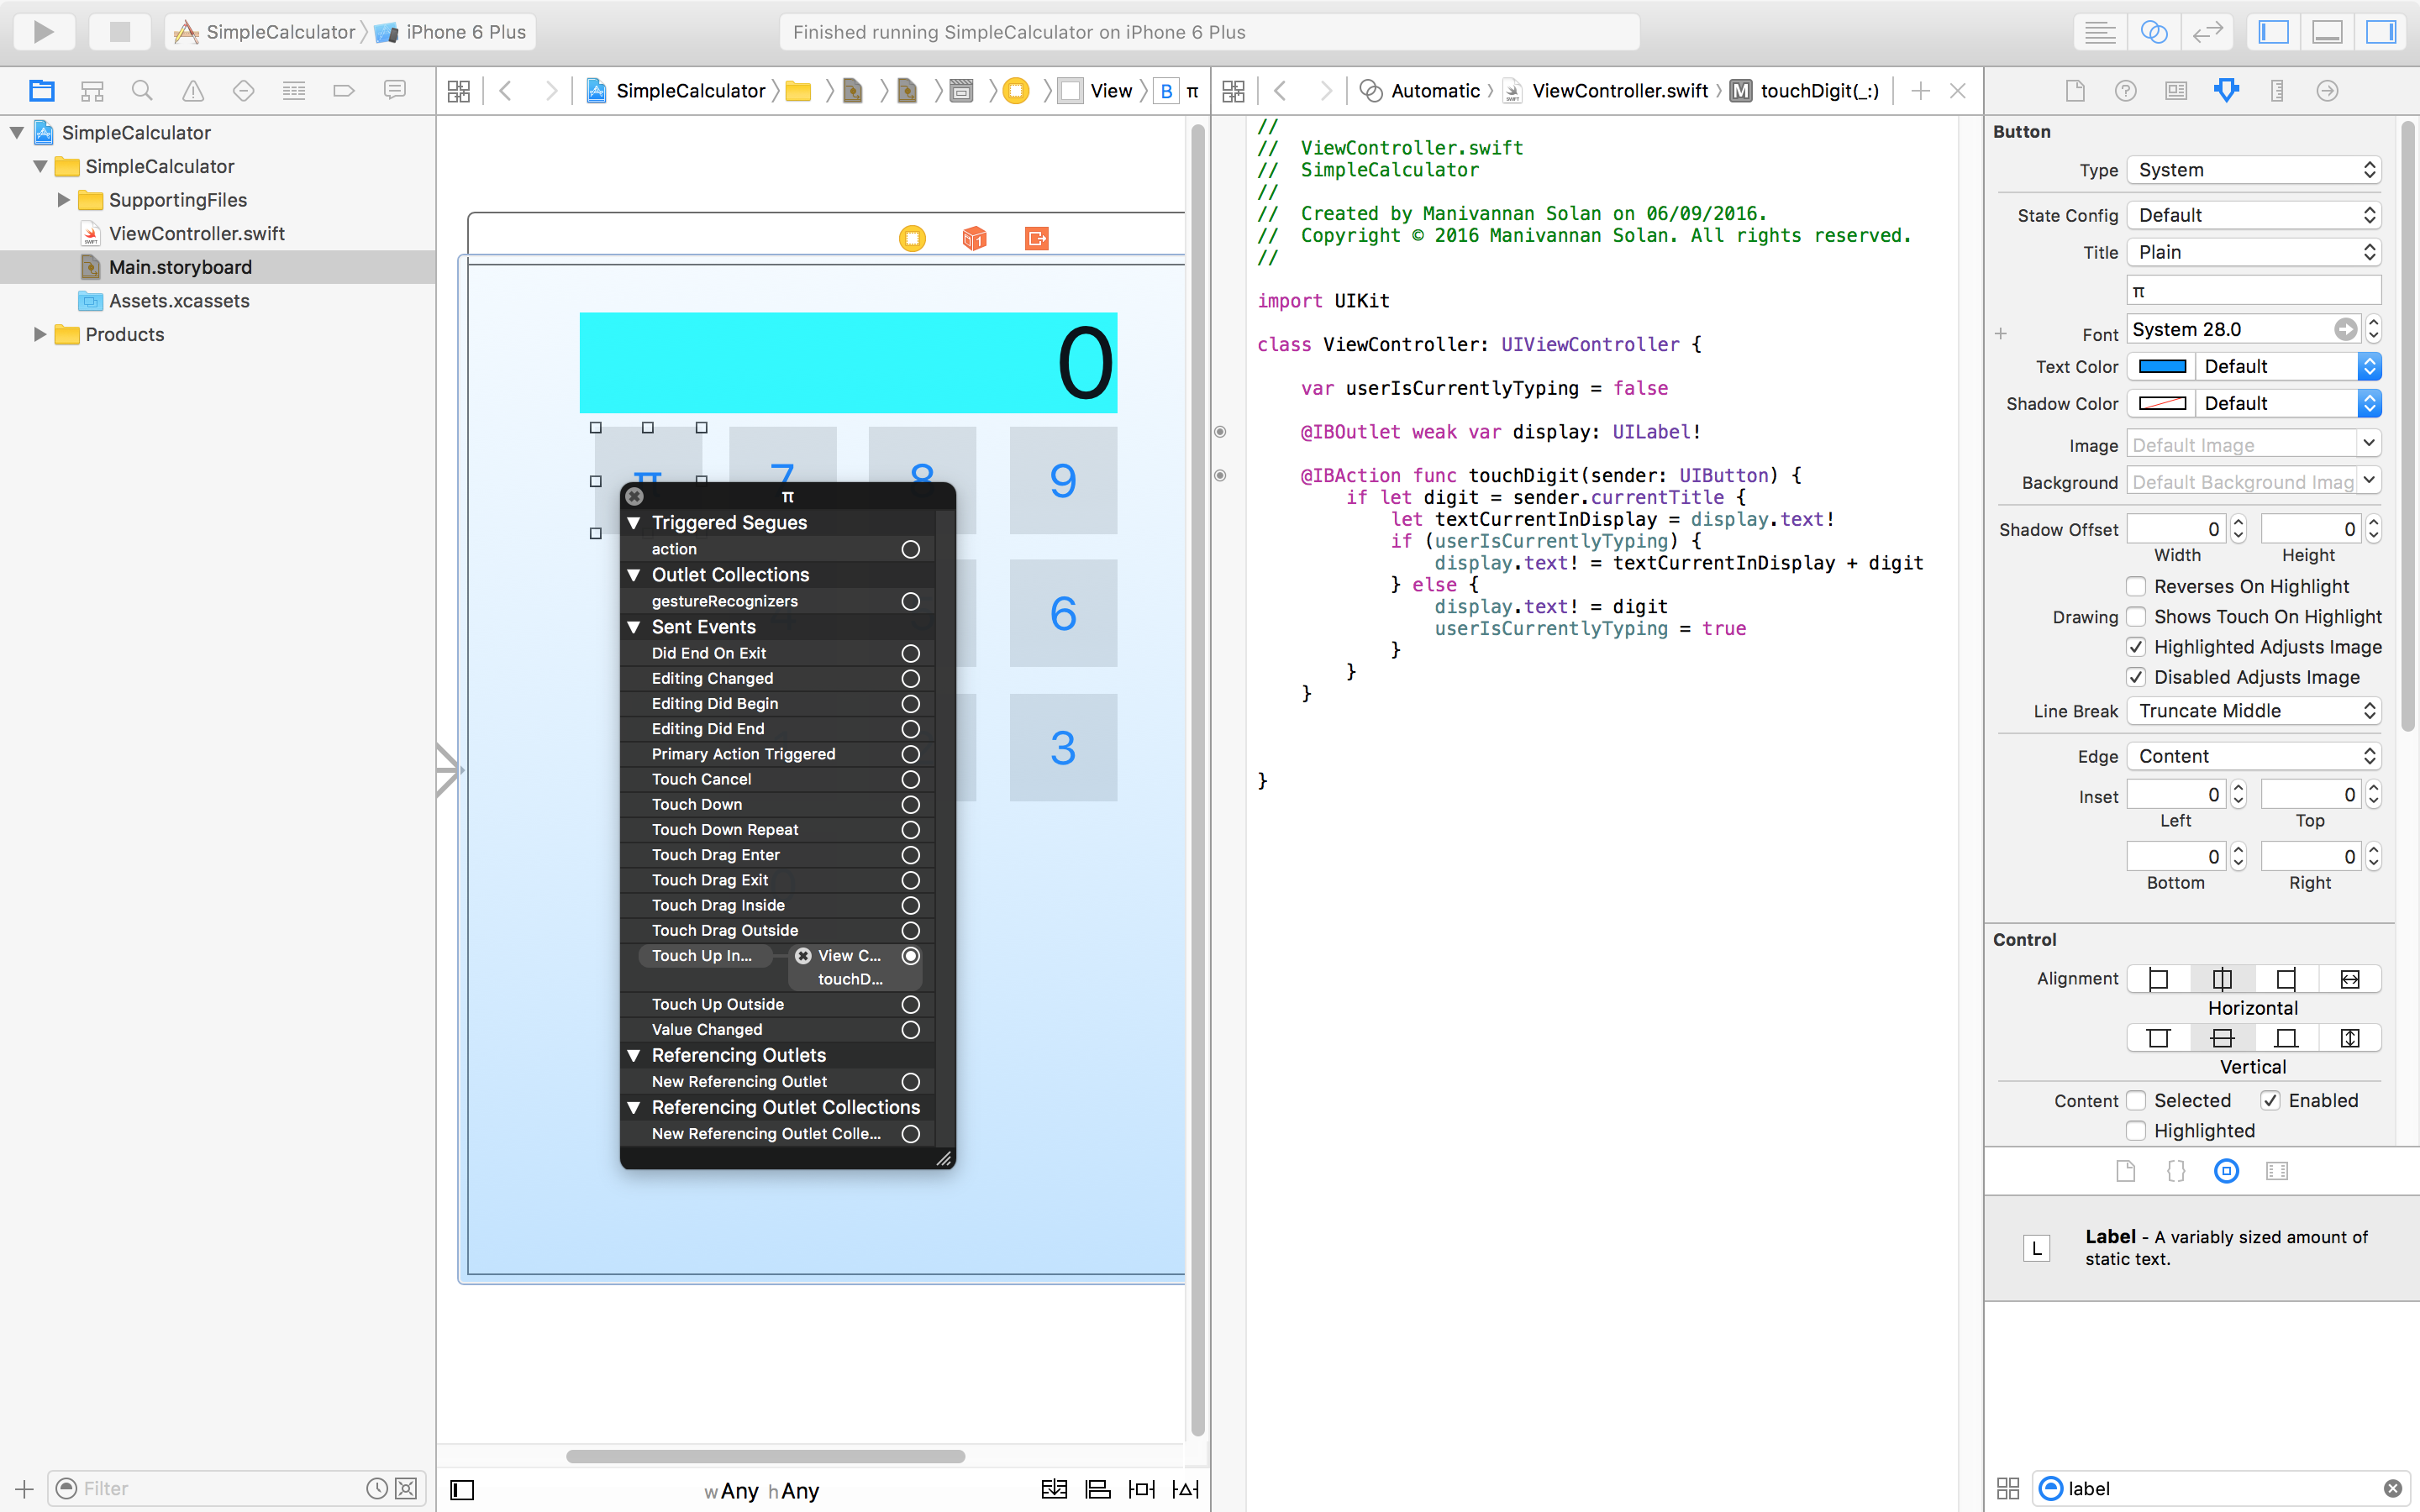 Figure 1: Removing the touchDigit association
So now we need to create a new action for this π button, however with more mathematical symbols to be added in the future, we should try to create a method to handle all of them. Like before we need to ctrl-click-drag the π button to the ViewController.swift to create an action. Remember to have side-by-side view to carry out this action. Figure 2 is a reminder for how to fill in the popup, however, you should try and get a feel for creating actions for UI elements as soon as possible.
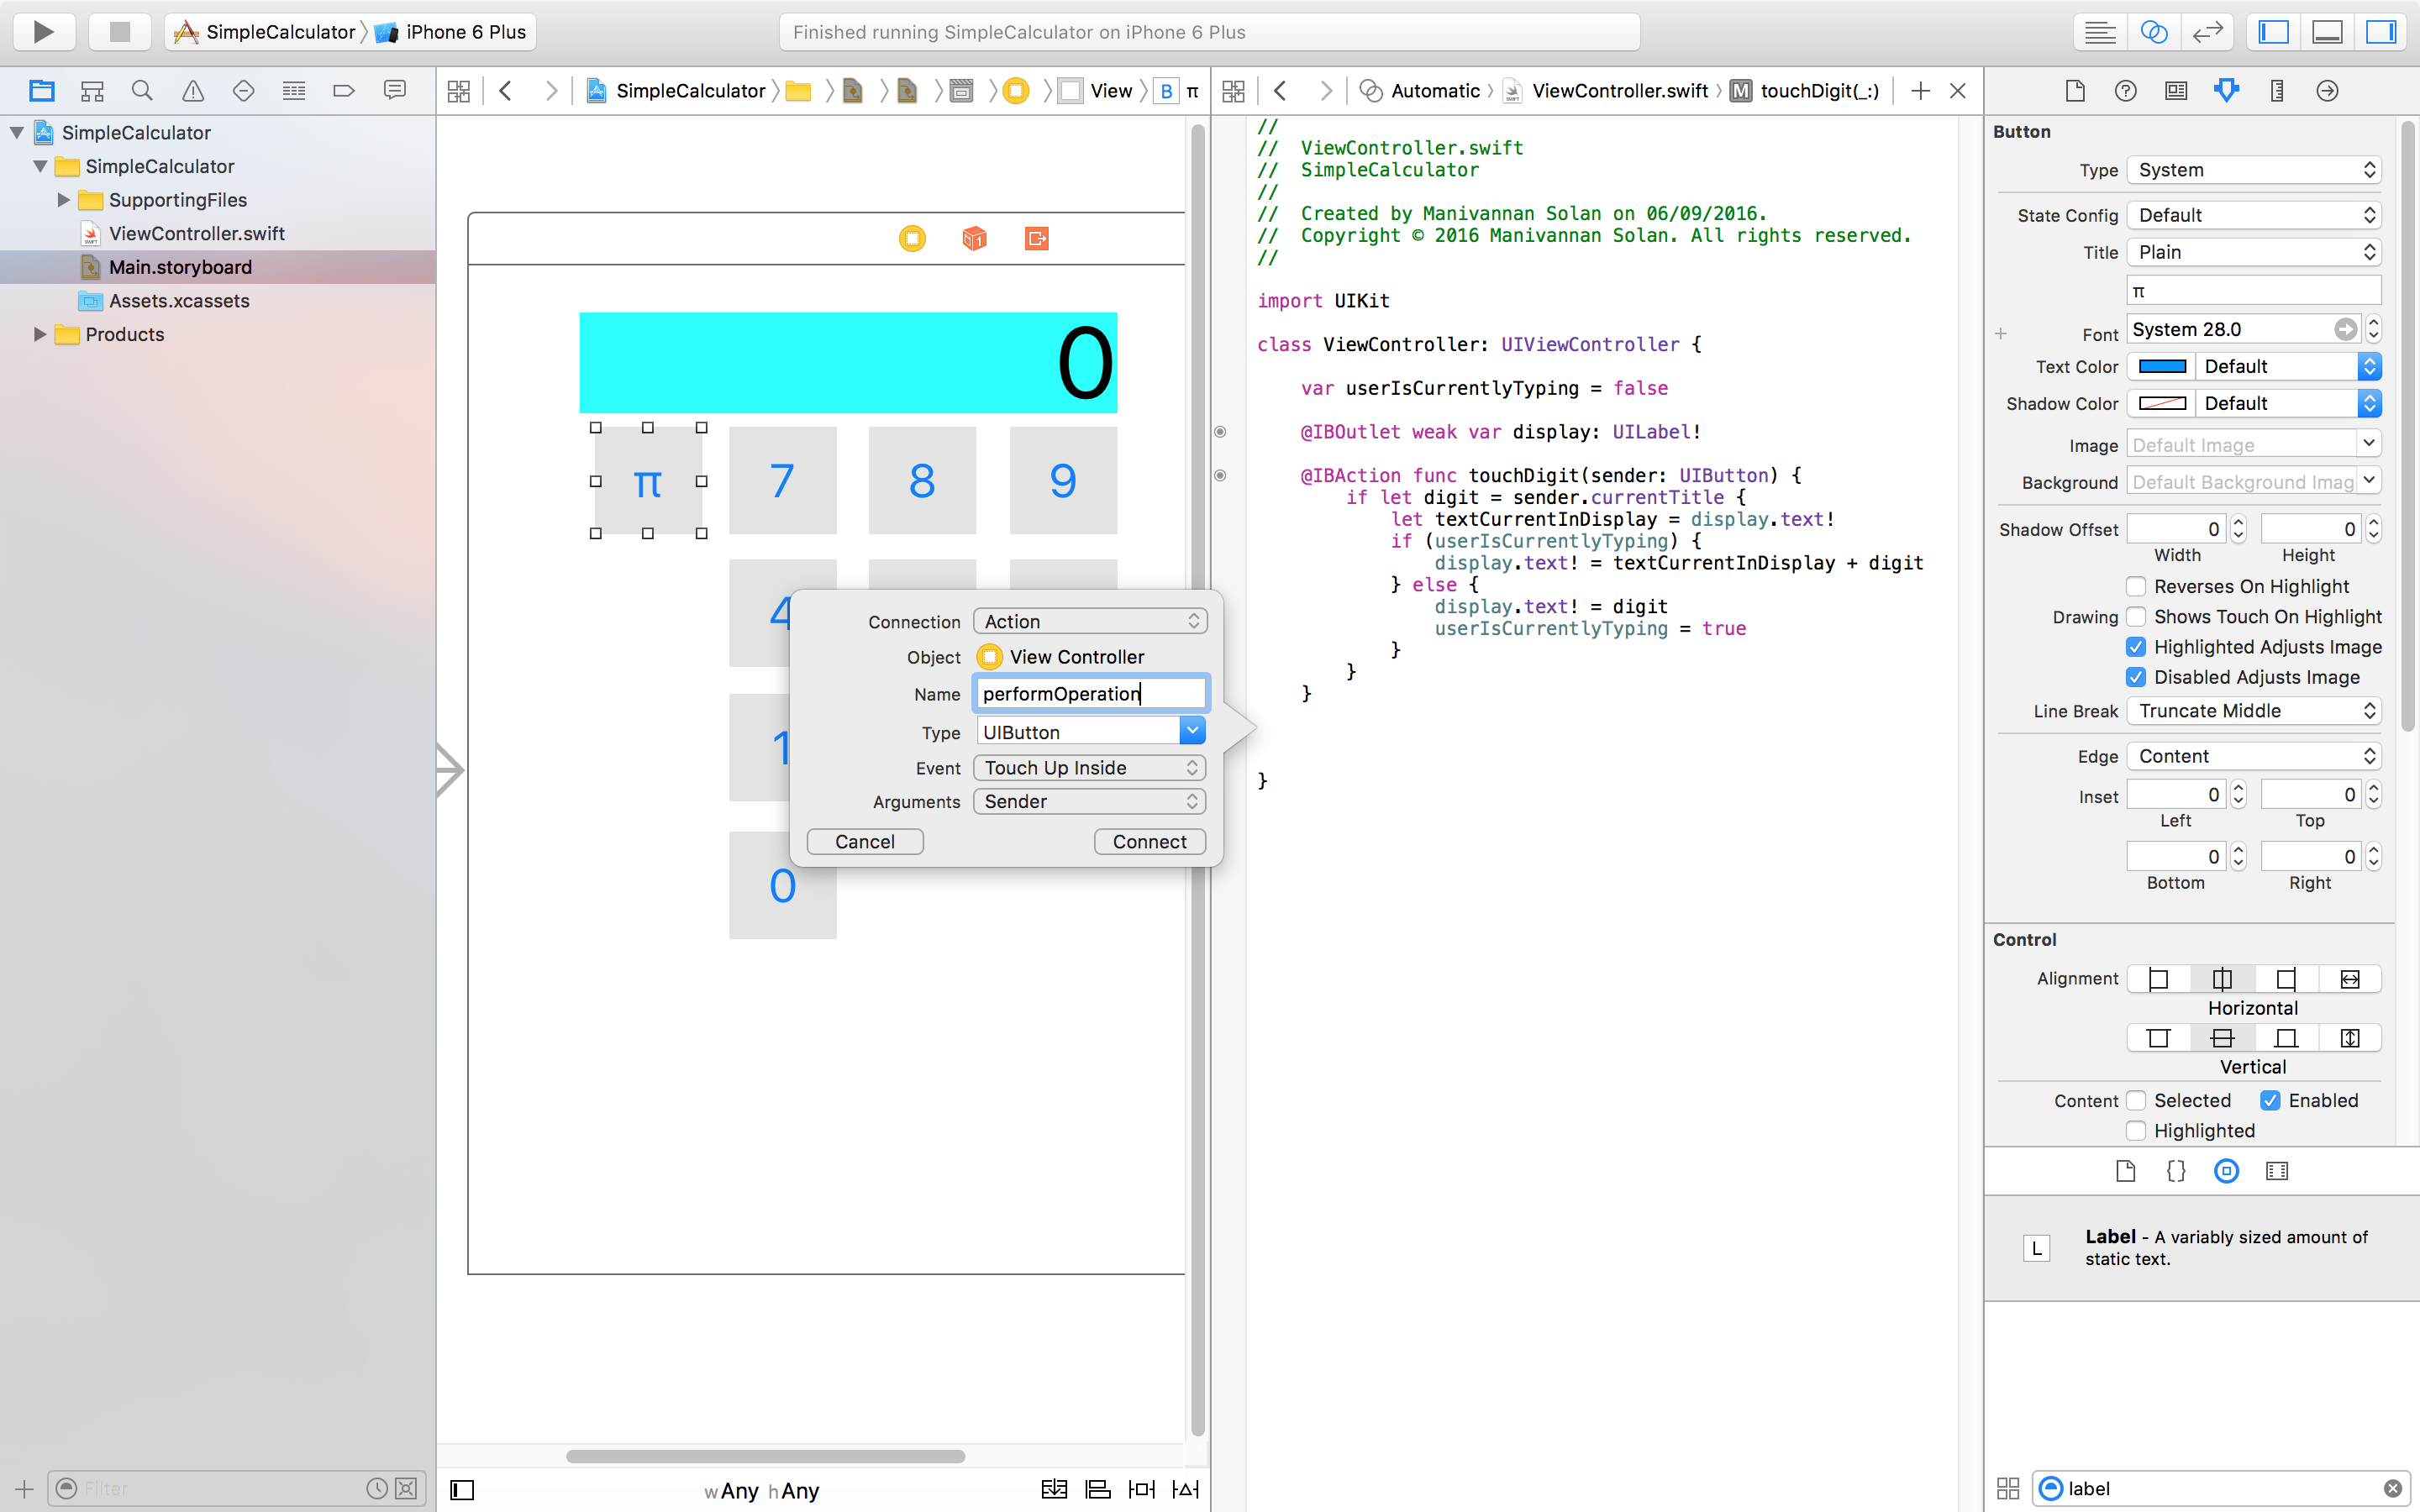 Figure 2: Adding a performOperation action.
Cast your mind back to what happens when you press the π button on a calculator. Recall that this will replace the current value in the display with the value of pi, and any future digits pressed will replace the pi value in the display - in other words, digits aren't appended to the value of pi. Therefore, we need to make sure the boolean variable userIsCurrentlyTyping is set to false before leaving the function.
Figure 3 shows a simple implementation of what we want to happen. We need to be careful with types, and do type-conversion where applicable. Already we see the code starting to get a bit messy, and considering the other mathematical symbols to add, we don't want to have loads of 'if' statements. We'll sort this out soon.
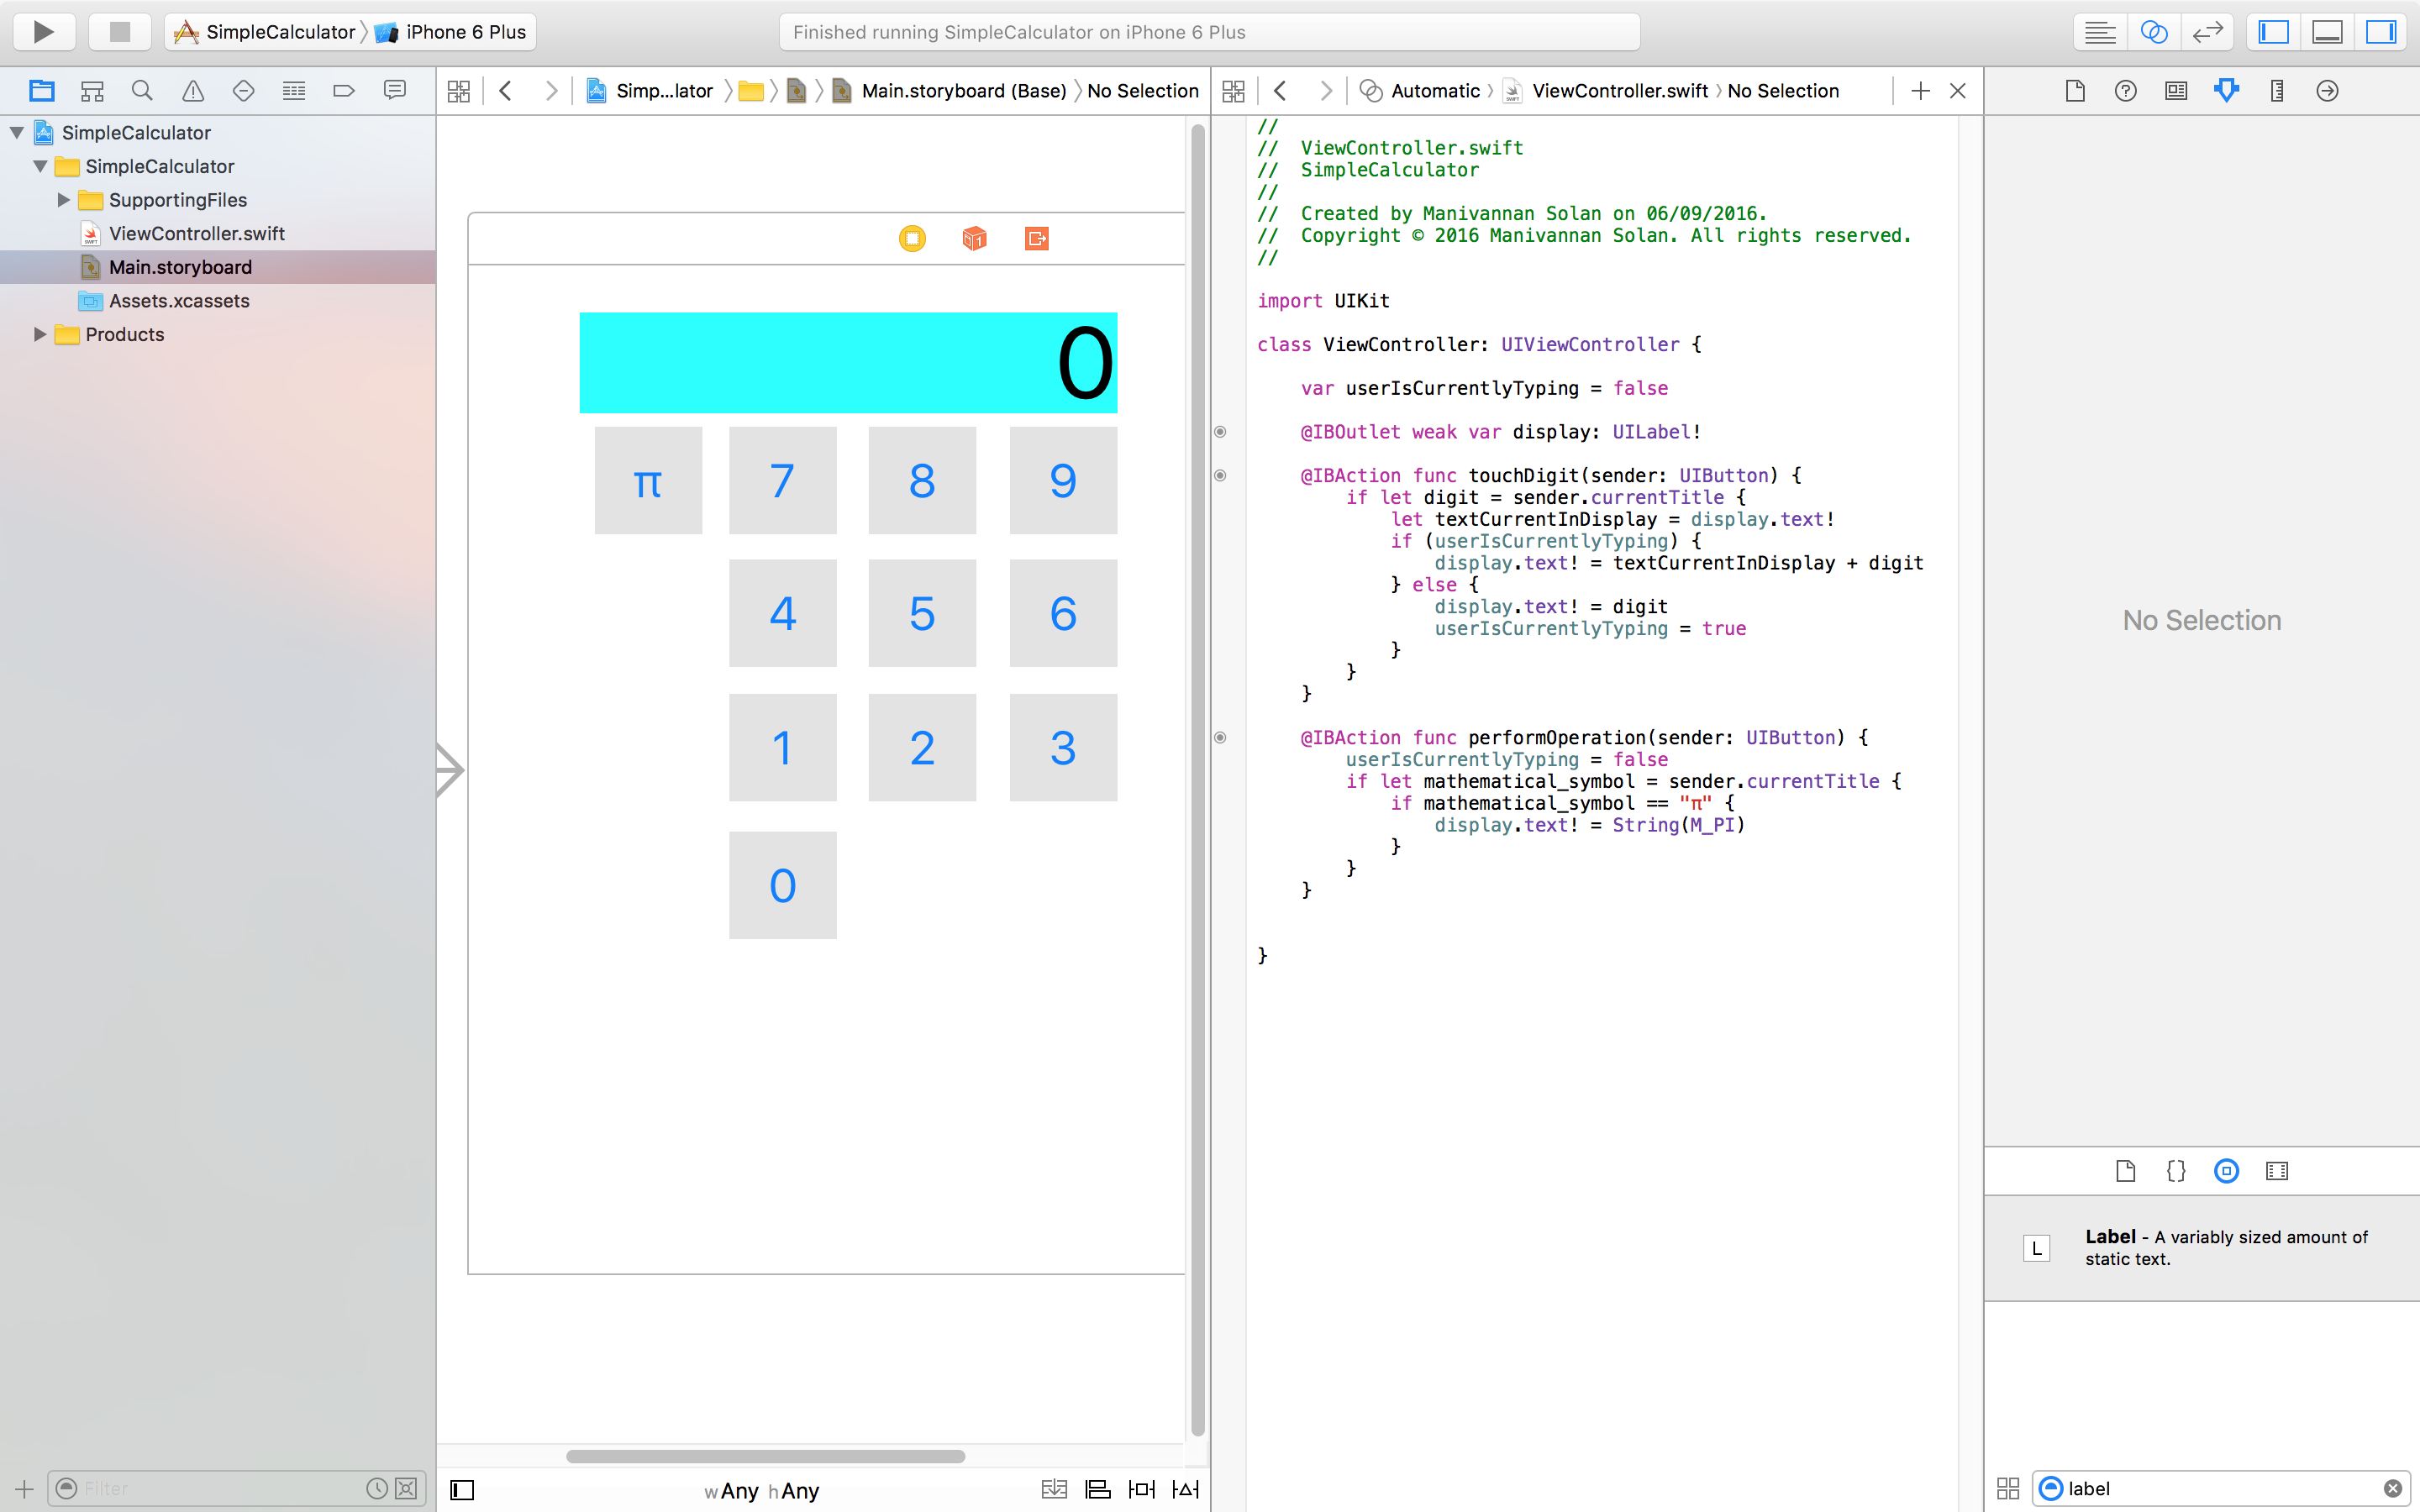 Figure 3: Simple implementation for performOperation.
Everytime we need to set the display's text value we need to do a type conversion. Thank's to the computed properties feature in Swift we only have to write code to do that once. A computer property is a special variable with a getter and setter. We will create a displayValue computed property that will return a type conversion of the display's value from String to Double and will set the display's value with a type conversion from Double to String. See Figure 4.
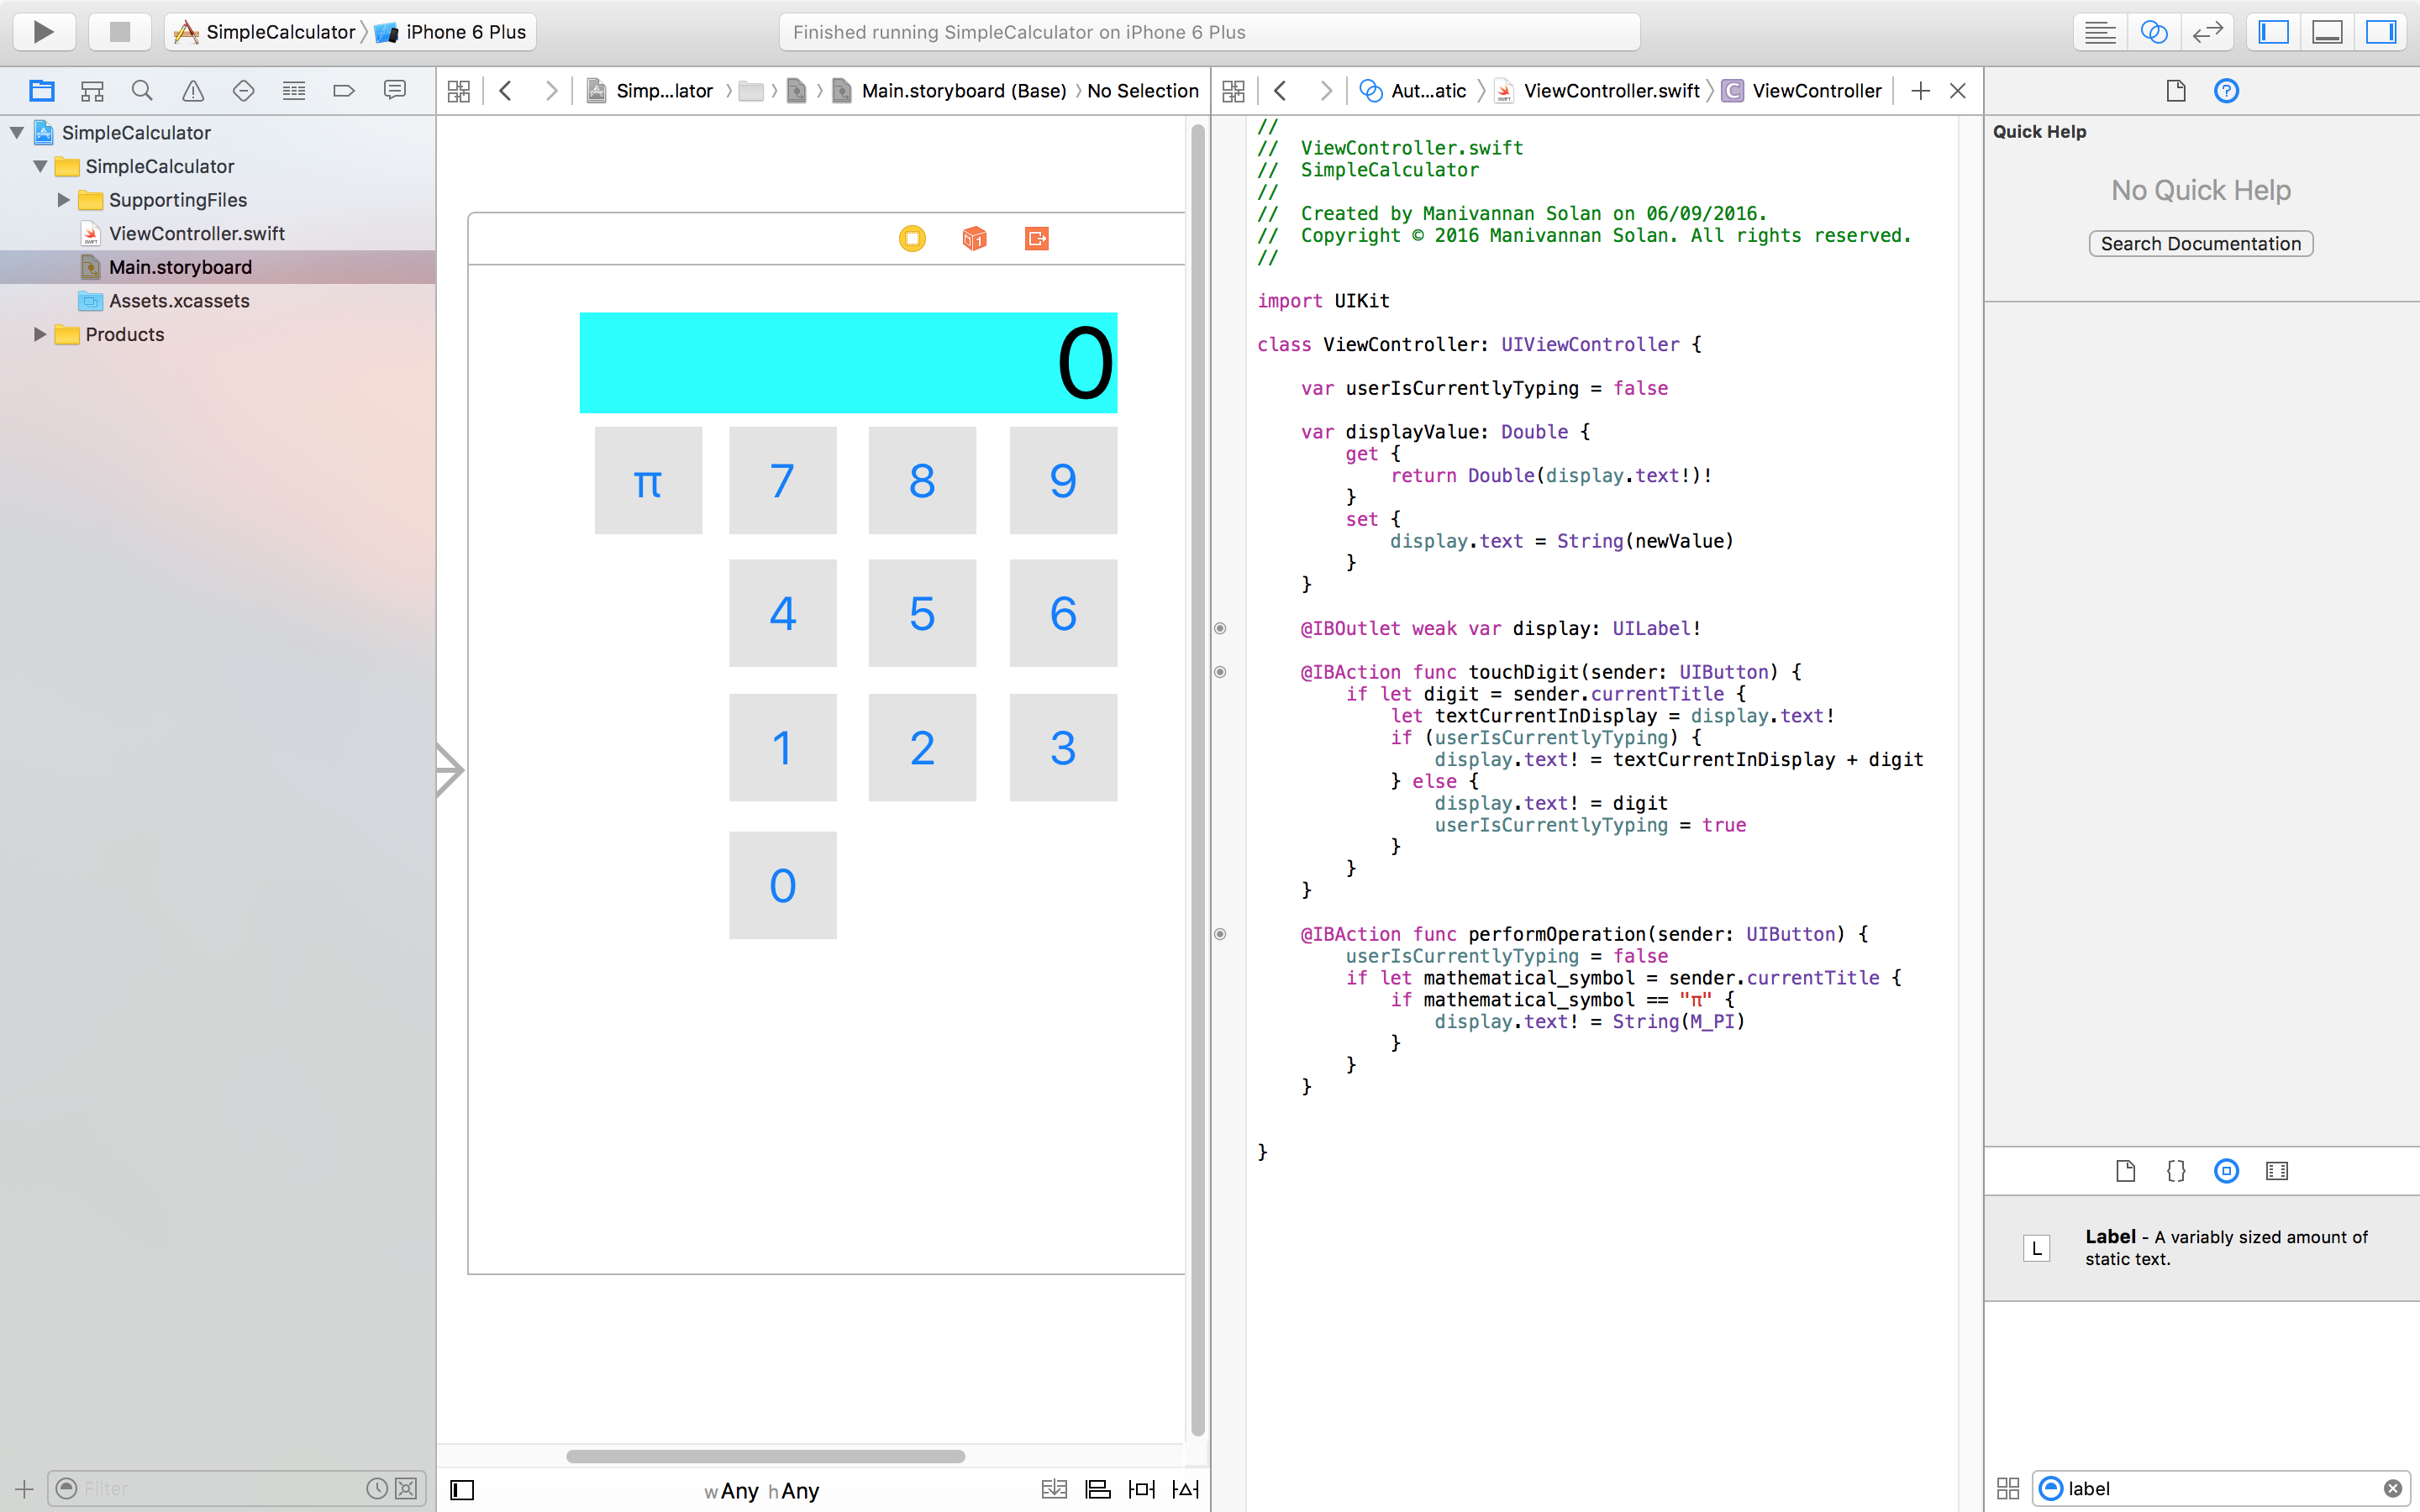 Figure 4: displayValue computed property.
There are few things to clarify. For the getter, we have two exclamation marks. The first one is to unwrap the UILabel's text variable as it's an optional. The second one is to ensure that we can do the type conversion from String to Double without breaking. What happens when you try to convert the String "hello" in to a Double? We use optionals to cover this case. For the setter you may have noticed that we do not unwrap the display.text, which is why there is no exclamation mark. This is because we are setting it's value rather than getting the value. In addition, the newValue is part of the computed property feature, which is why it cannot be seen declared anywhere in the code. It's essentially a kind of 'placeholder' for the thing you have set the computed property to.
As a result of this change, we can now replace the line inside the π conditional statement of performOperation to something more simple and readable - displayValue = M_PI.
Exercise: Add a squareroot button to the storyboard, and add a conditional in performOperation to handle the case.
The first bit is quite simply, as we are using the performOperation action again, we can just simply copy-paste the π button that we have created, and replace the text inside to a sqrt √ (alt-v). The code for the conditional inside the performOperation method is also trivial with use of the sqrt() function, and our computed property. See Figure 5 for a complete look.
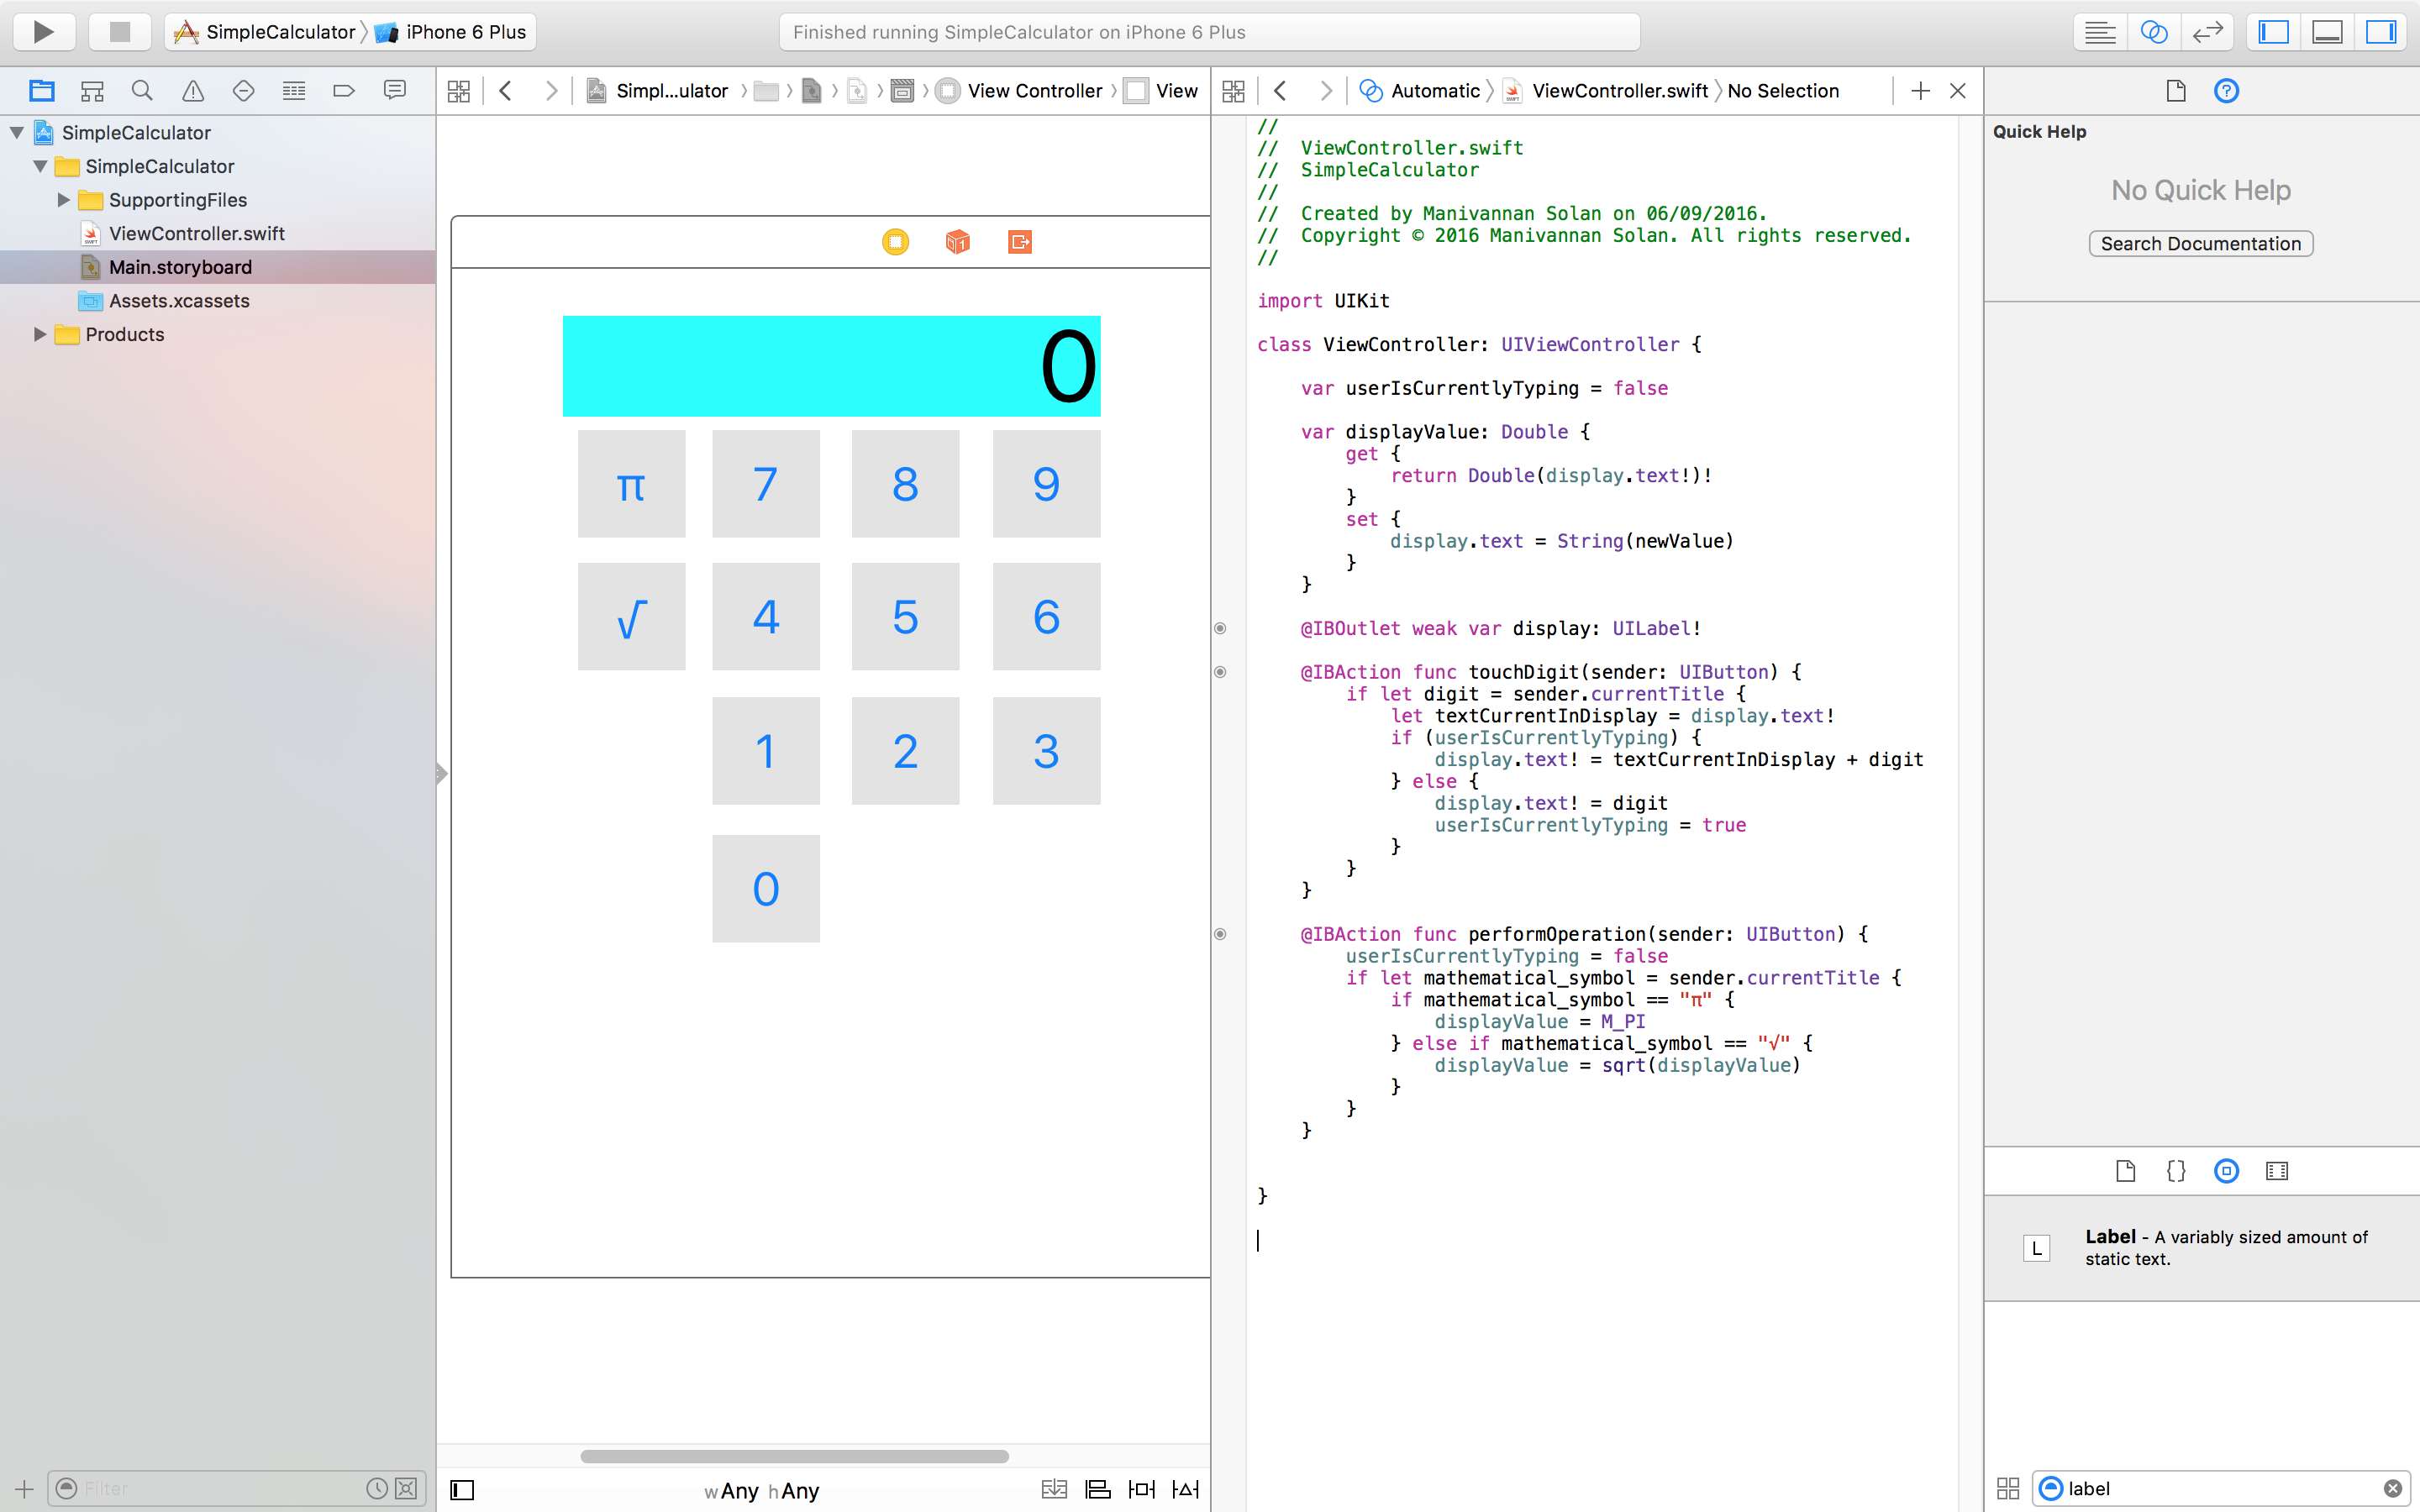 Figure 5: Squareroot button exercise complete.
Hang on, take a close look at the code you have just written for the squareroot in performOperation. Cast your mind back to the MVC paradigm that is particularly essential to iOS development. The Model should be what the application does, and in this case the calculations, yet we are doing a calculation in the Controller.
Adding a model to our application.
To add a model class, go to File->New->File. This will bring up a dialog box to select what kind of file. We want to create an iOS source file (Swift file). We can call it CalculatorBrain to remind us that this is where all the calculations will be done i.e. the brain of the calculator. Let's add some template code to get a feel for what will be going here. We need a read-only property to keep track of the result, and this can be done by only implementing the getter of a computed property. Remember that we came across read-only properties before - currentTitle of a button. We will also add some empty methods namely setOperand and performOperation. Refer to Figure 6. We forgot to mention previously, you may have not even noticed, but we must include types for computed properties - they cannot be inferred.
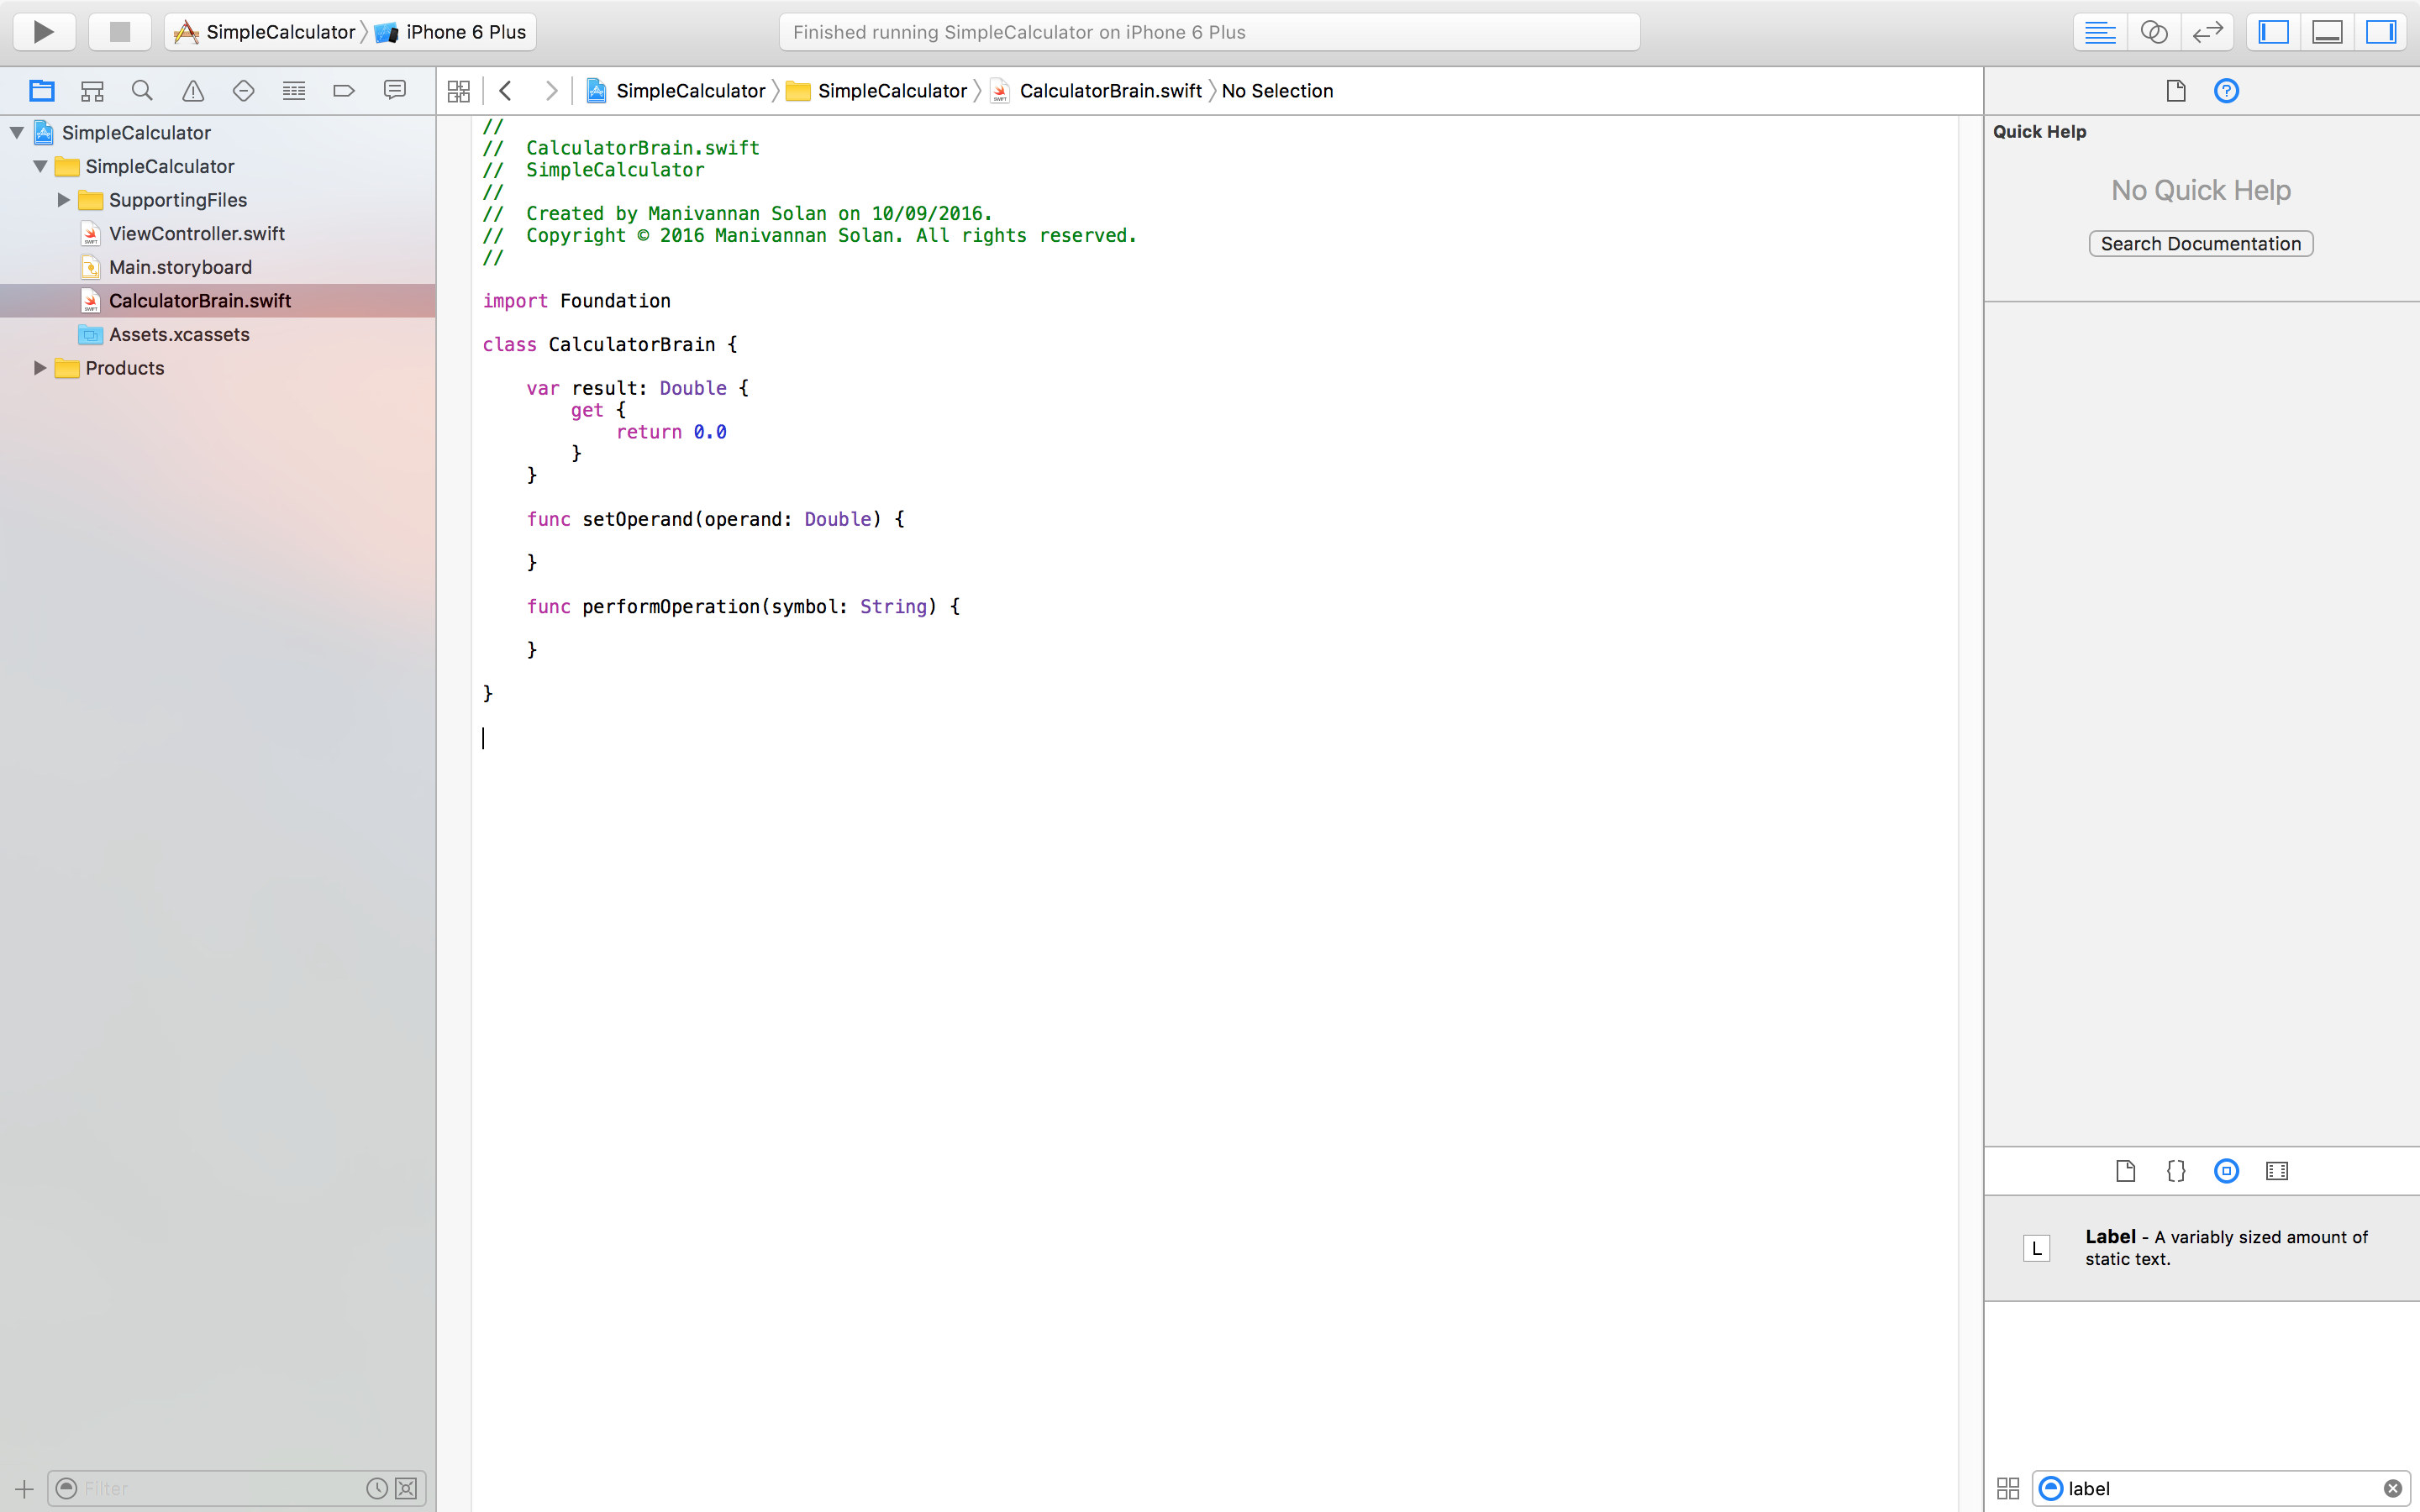 Figure 6: Our CalculatorBrain class.
Break: Encapsulation in Swift
Let's quickly discuss visibility in Swift. So far every function and variable we have implemented is public. The model needs to be public because otherwise we couldn't call into it from our controller. The controller should be made as private as possible - there won't be many times where you will have to call into the controller. A useful way of revealing the public API of a class is to use the side-by-side view and open the class on one side, and using the drop-down menu on the other side to select the corresponding counterpart class. Figure 7 shows you how to do this and figure 8 shows the result.
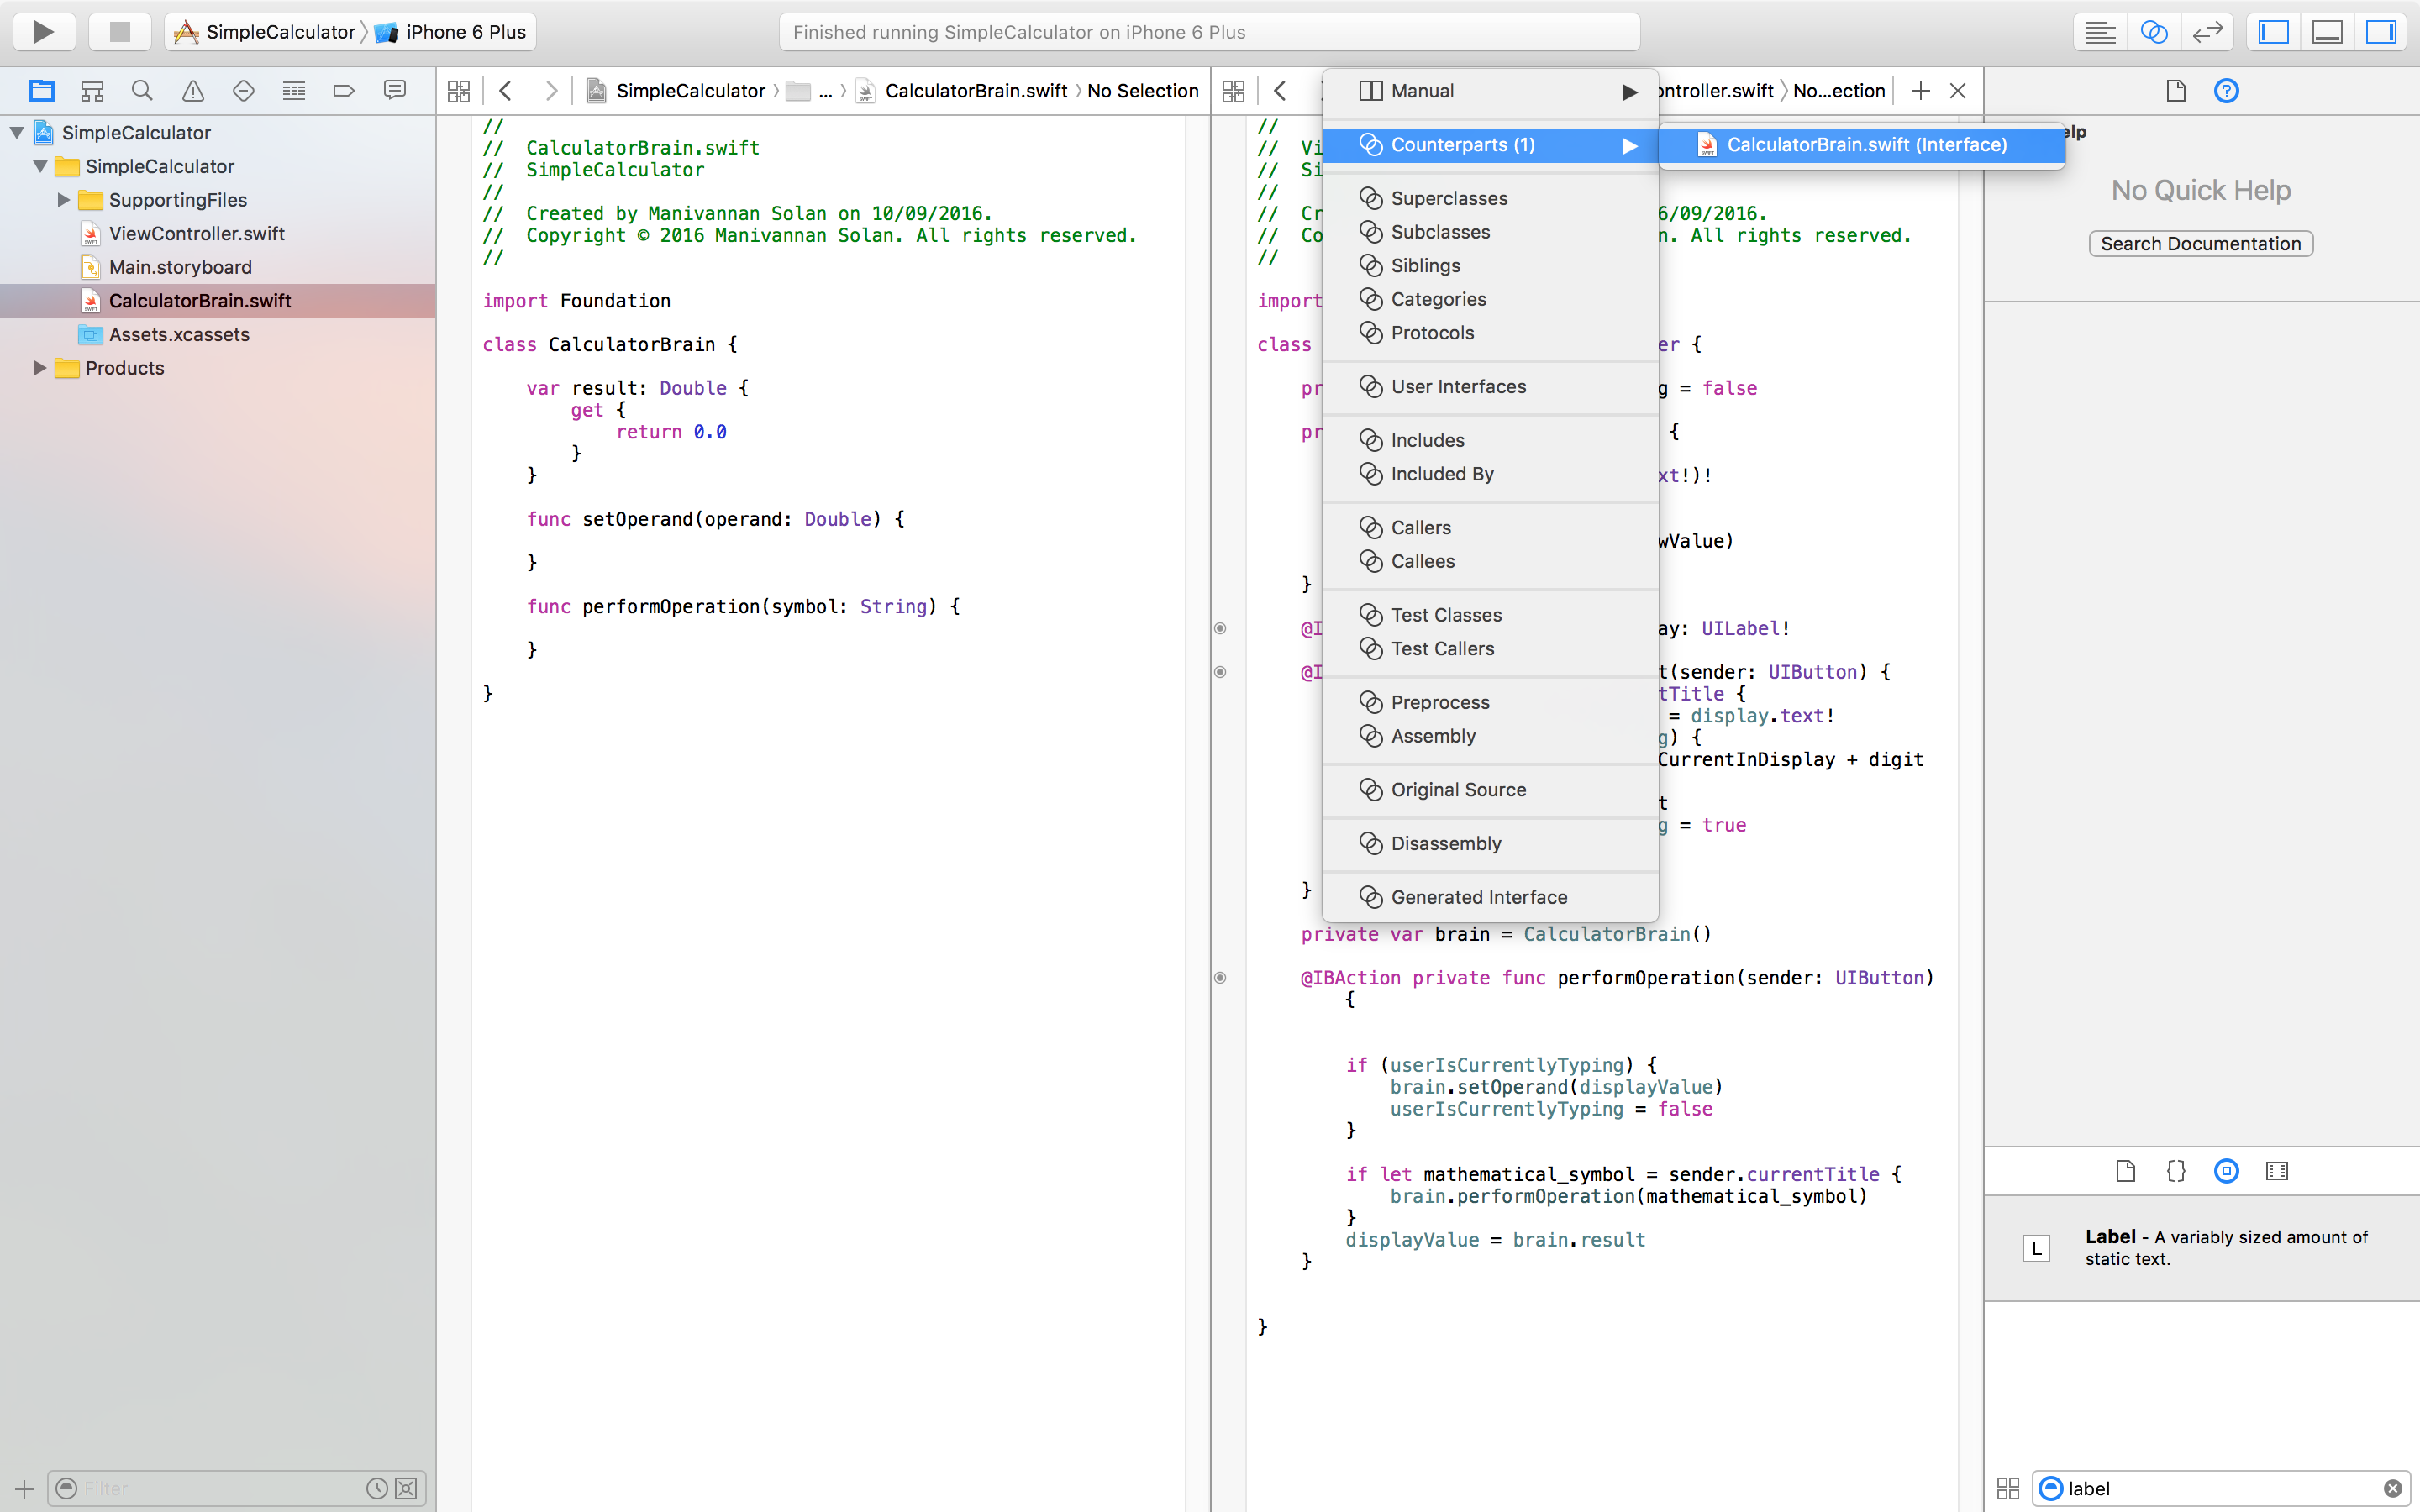 Figure 7: Revealing Public API of a class.
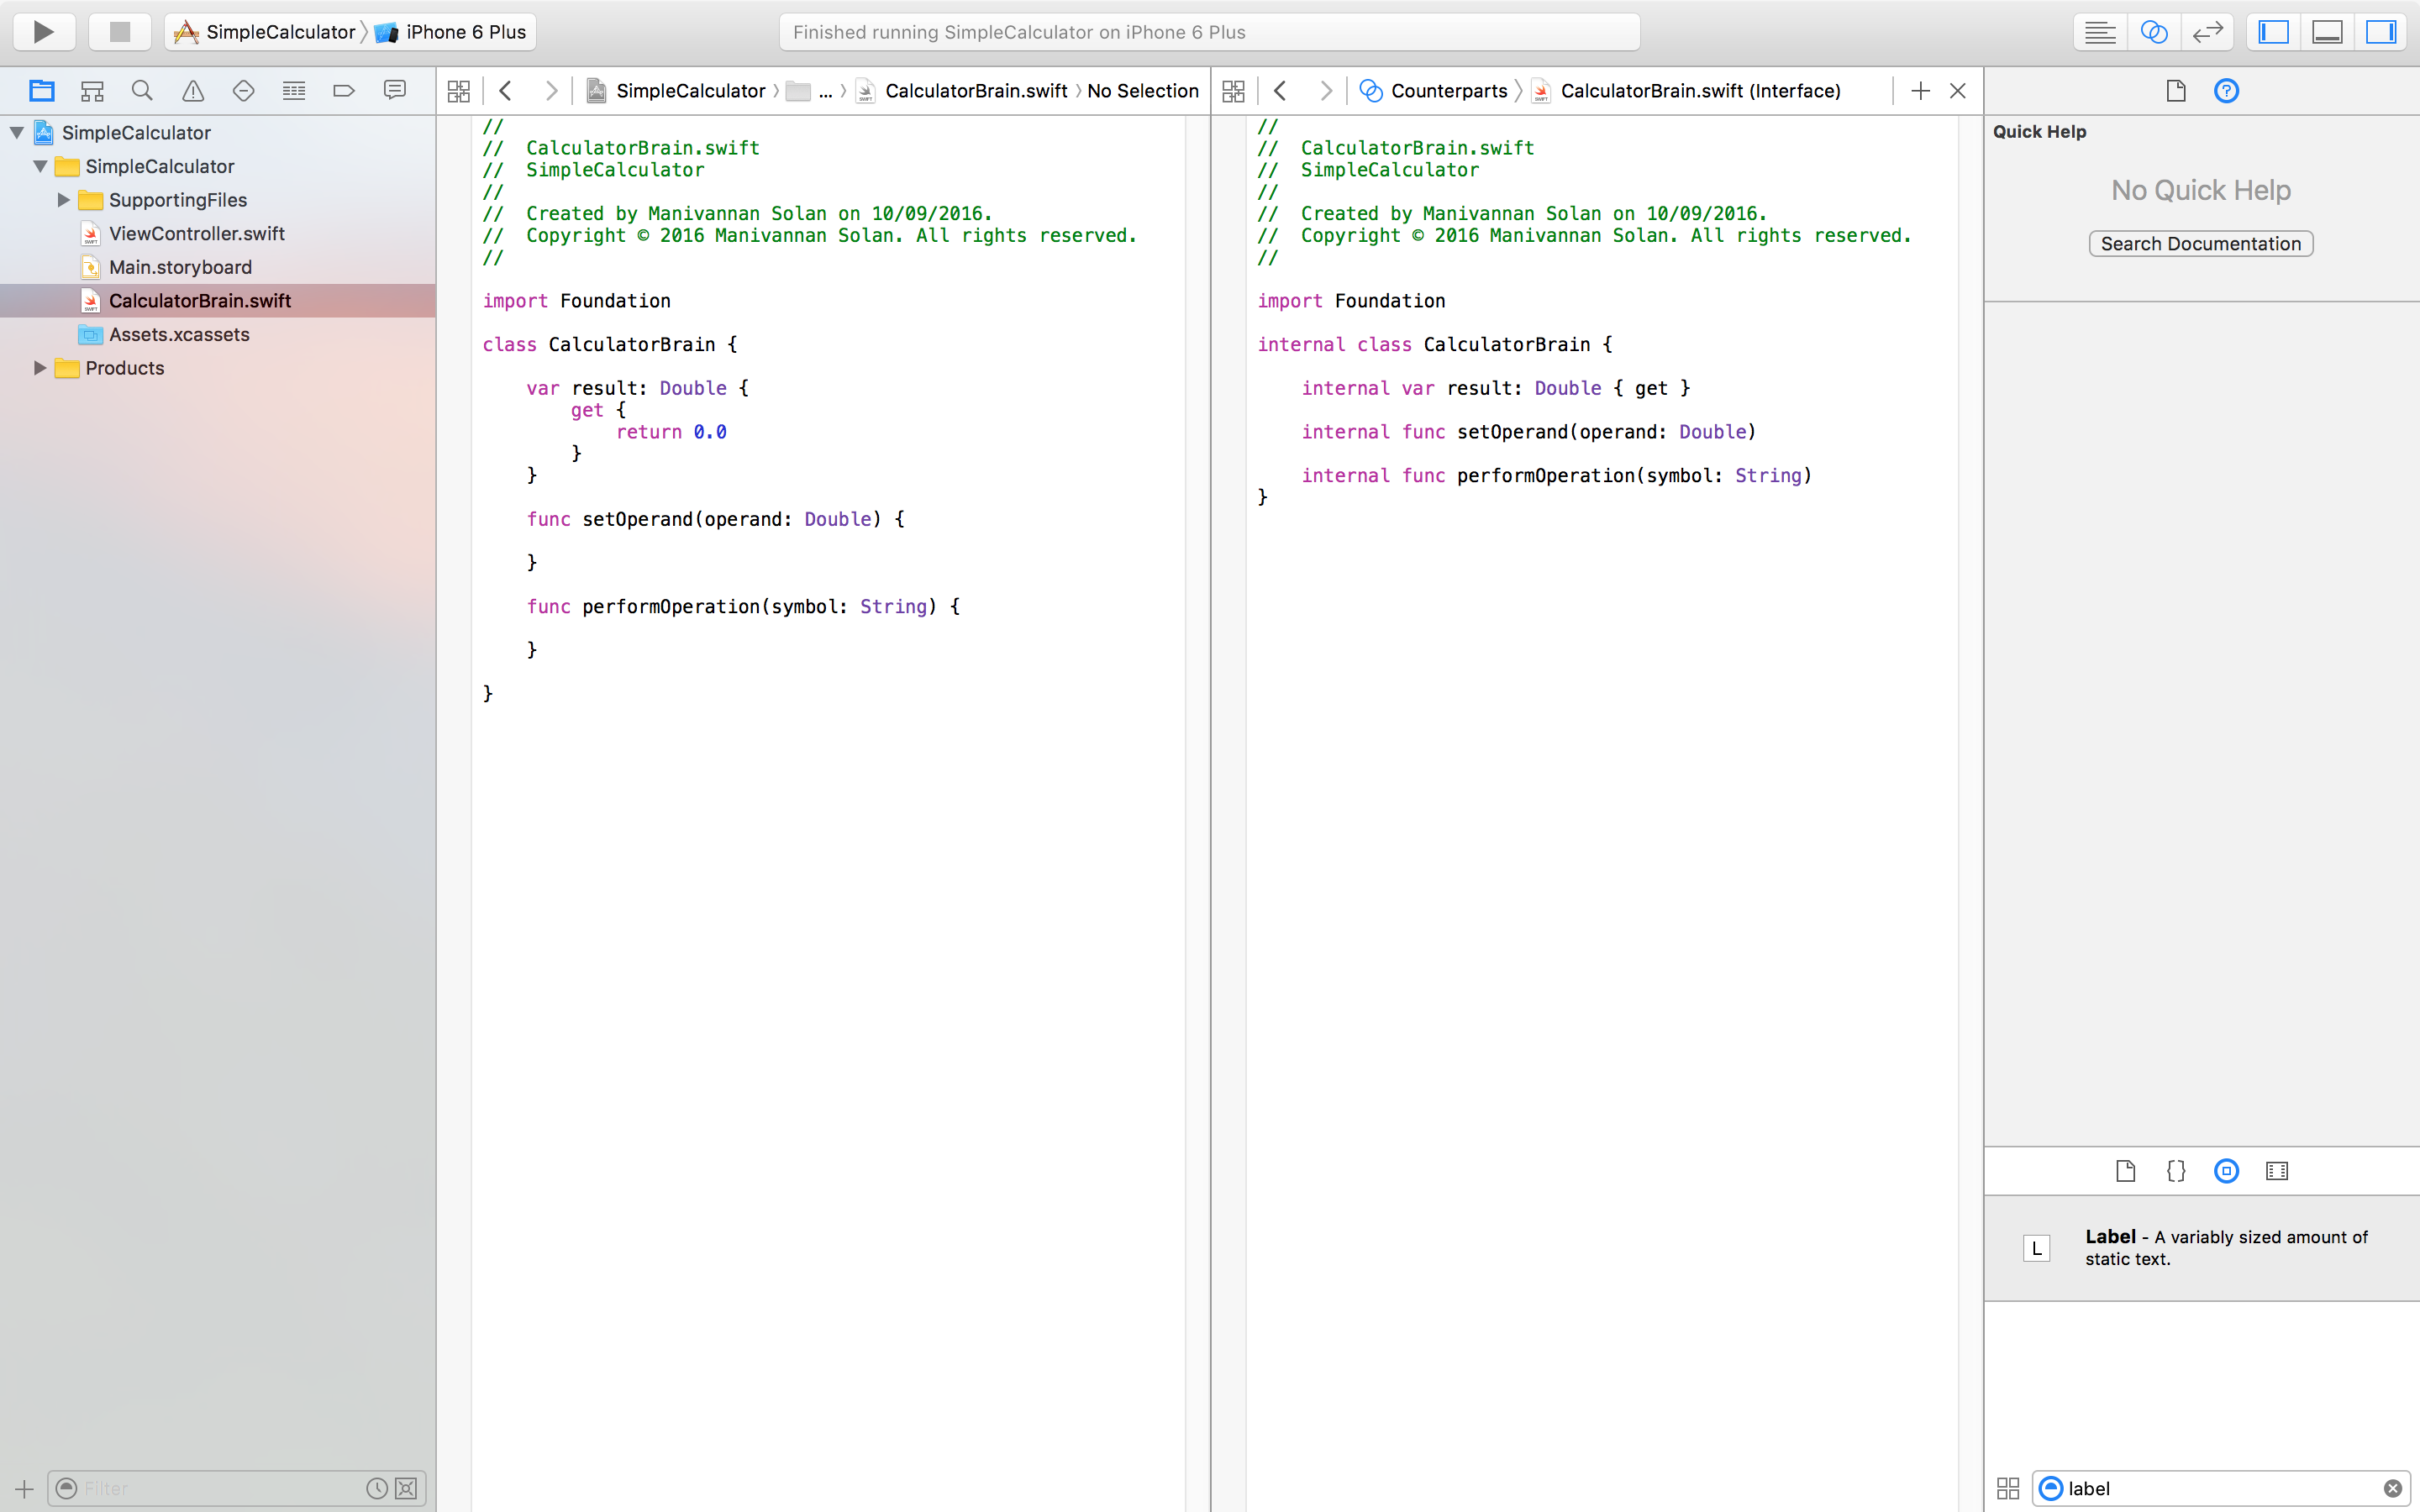 Figure 8: Calculator Brain Public API.
The generated interface is useful in showing your public API of a class. There is a slight difference between public and internal. Public means that the method/variable is available to all classes whereas internal means that it is only available to classes in the same module. We can go ahead and make everything in the ViewController private.
Implementing the model
Before we start adding code to our model, let's prepare the controller. In order to call into the model, we need to have a model instantiated in the controller. When performing an operation such as addition we need to remember the first operand, the controller needs to tell the model to do this. In addition, as we said before, we need to perform calculations in the model rather than the controller. To do this, the performOperation method in the controller should call a method in the model - maybe the same name sounds reasonable. The performOperation method in the controller should then update the display value to the result in the model. The updated code for the controller is shown in Figure 9.
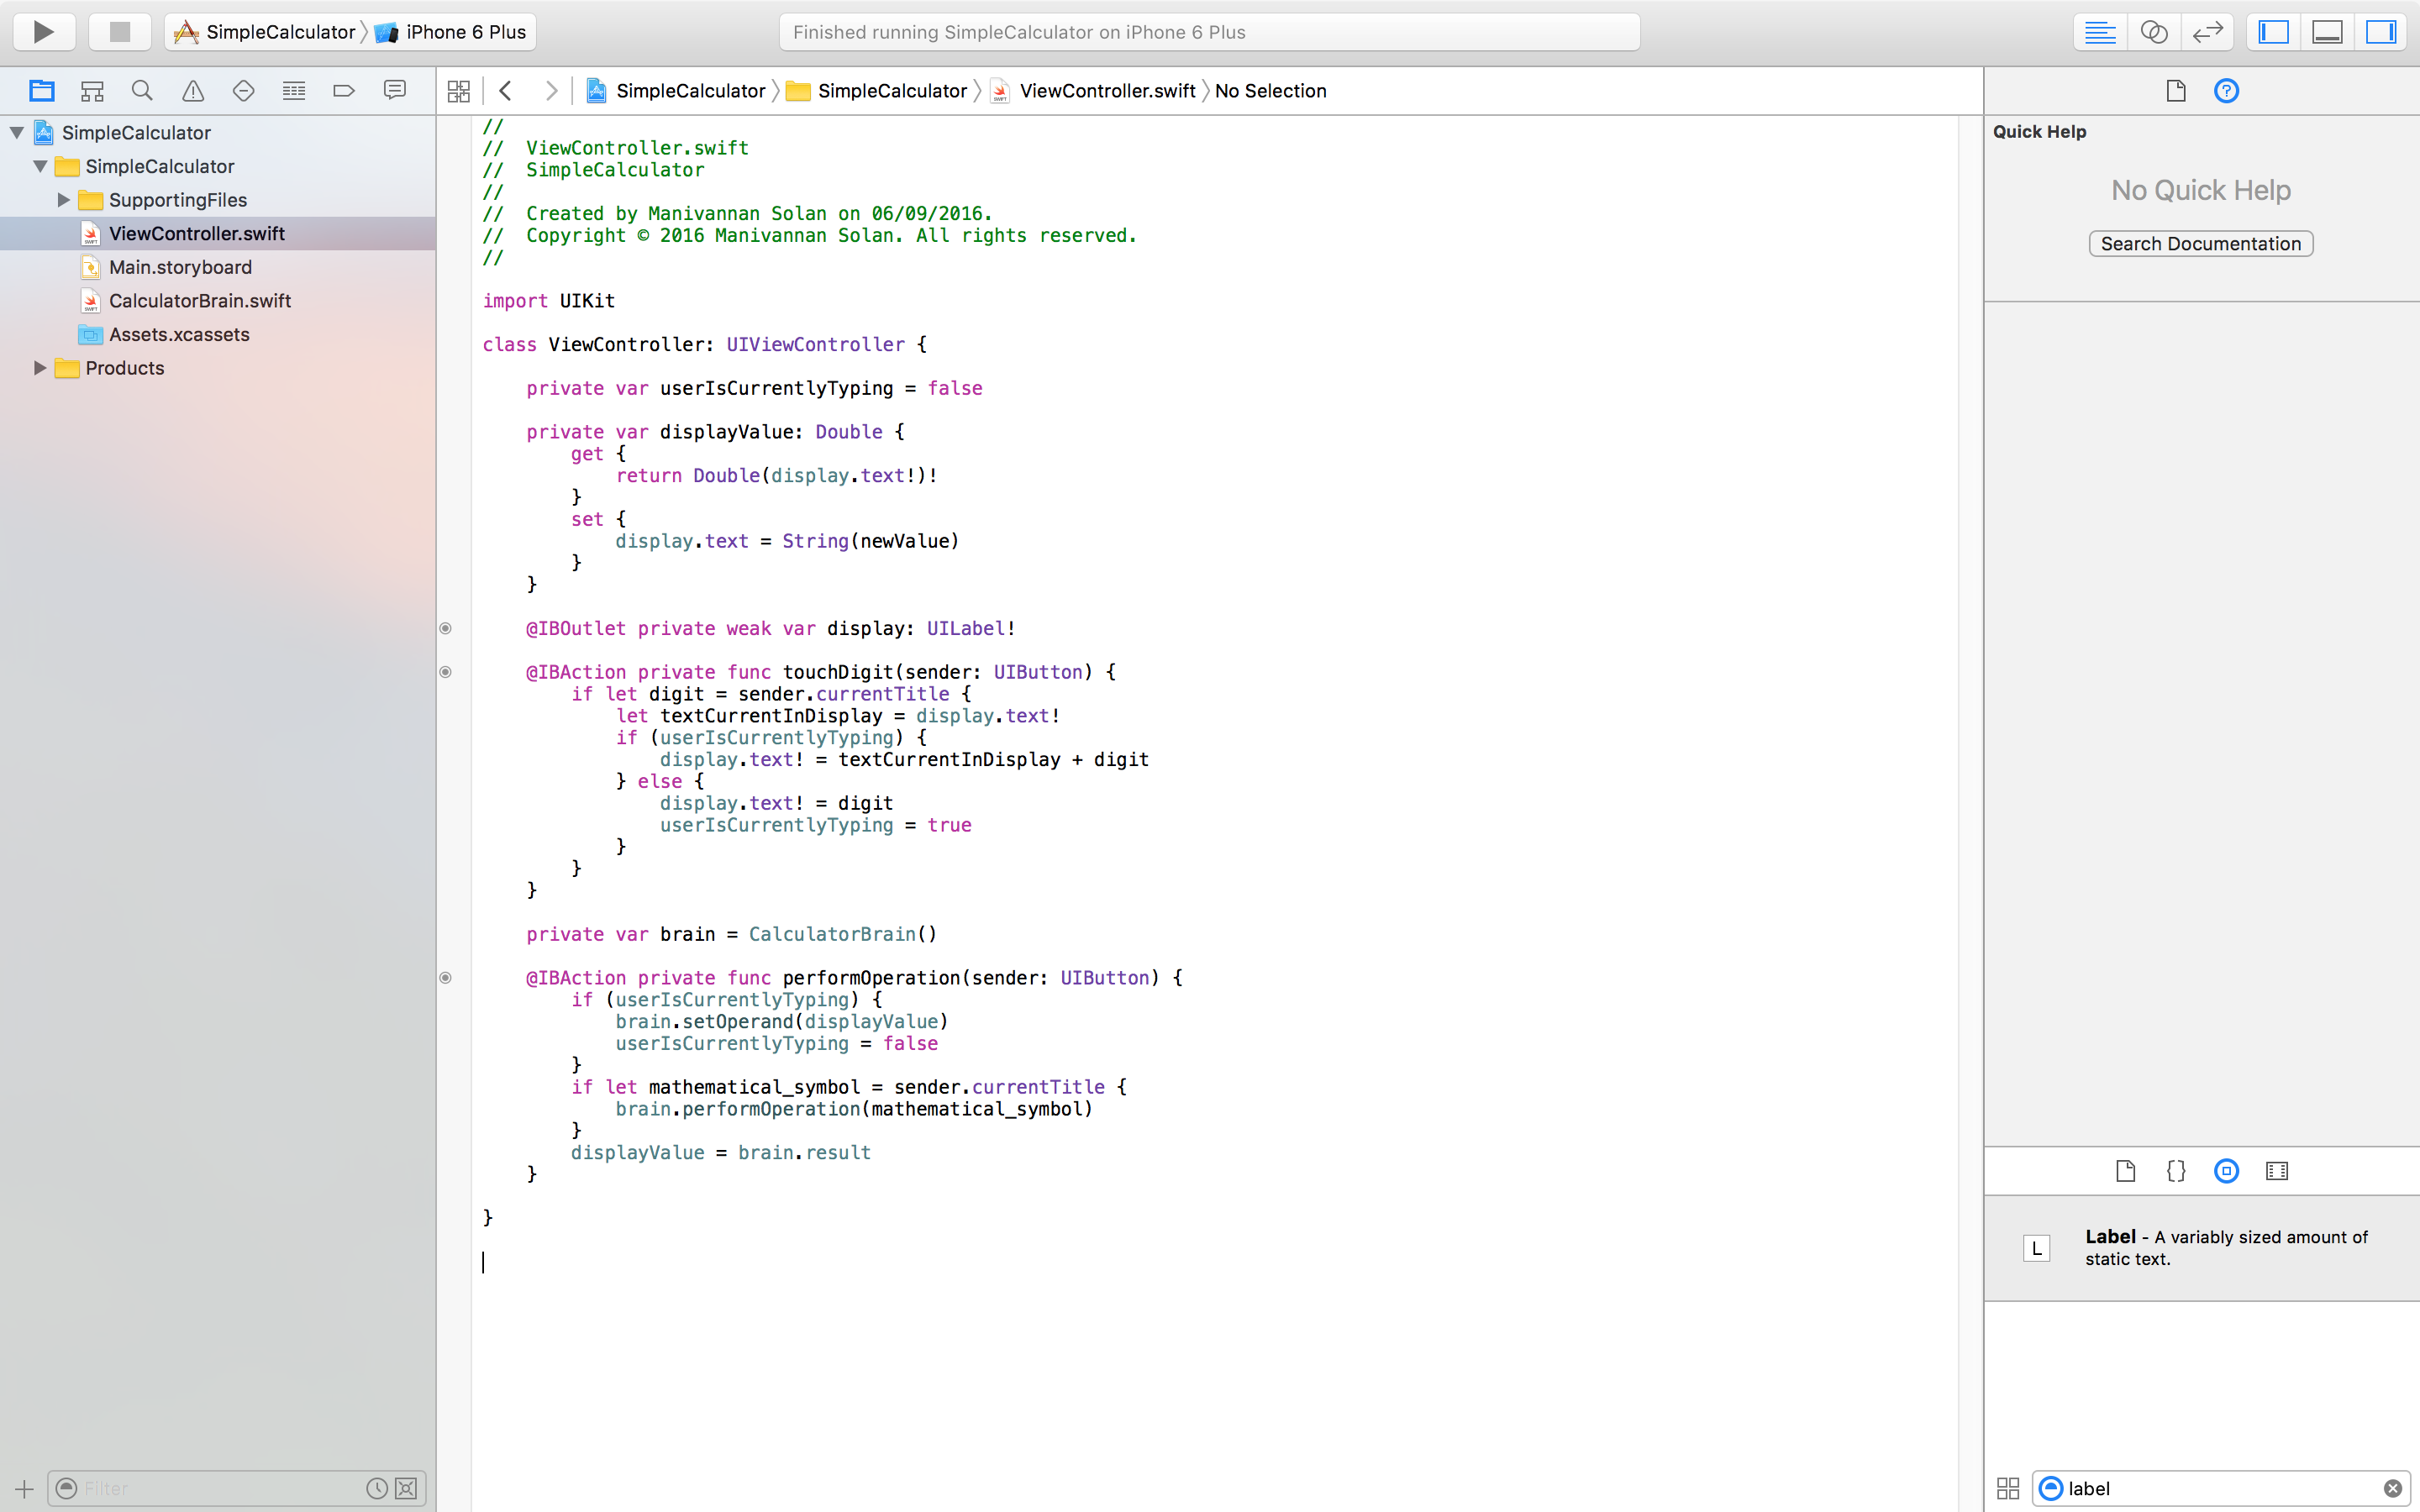 Figure 9: performOperation in ViewController.swift updated.
We can now start adding to our CalculatorBrain class having figured out beforehand what methods would be called by the controller and what they would need to do. Like we said, we need the model to keep track of the first operand of an operation. To do this we will have a private accumulator variable. The setOperand function can then simply set this variable to the argument passed to it, which will be the display's value converted to a double by the controller's computed property. The performOperation method in the model can now have similar code to what we originally had for performOperation in the controller. However, instead of having if statements handle several different cases, we can use a switch statement. Remember that a switch statement needs to cover all possible cases, and as we are switching on a string, this can be an infinite number of strings. Therefore, we need a default case to handle cases not covered. The read-only property result can simply return the accumulator value. Figure 10 reveals the updated model class.
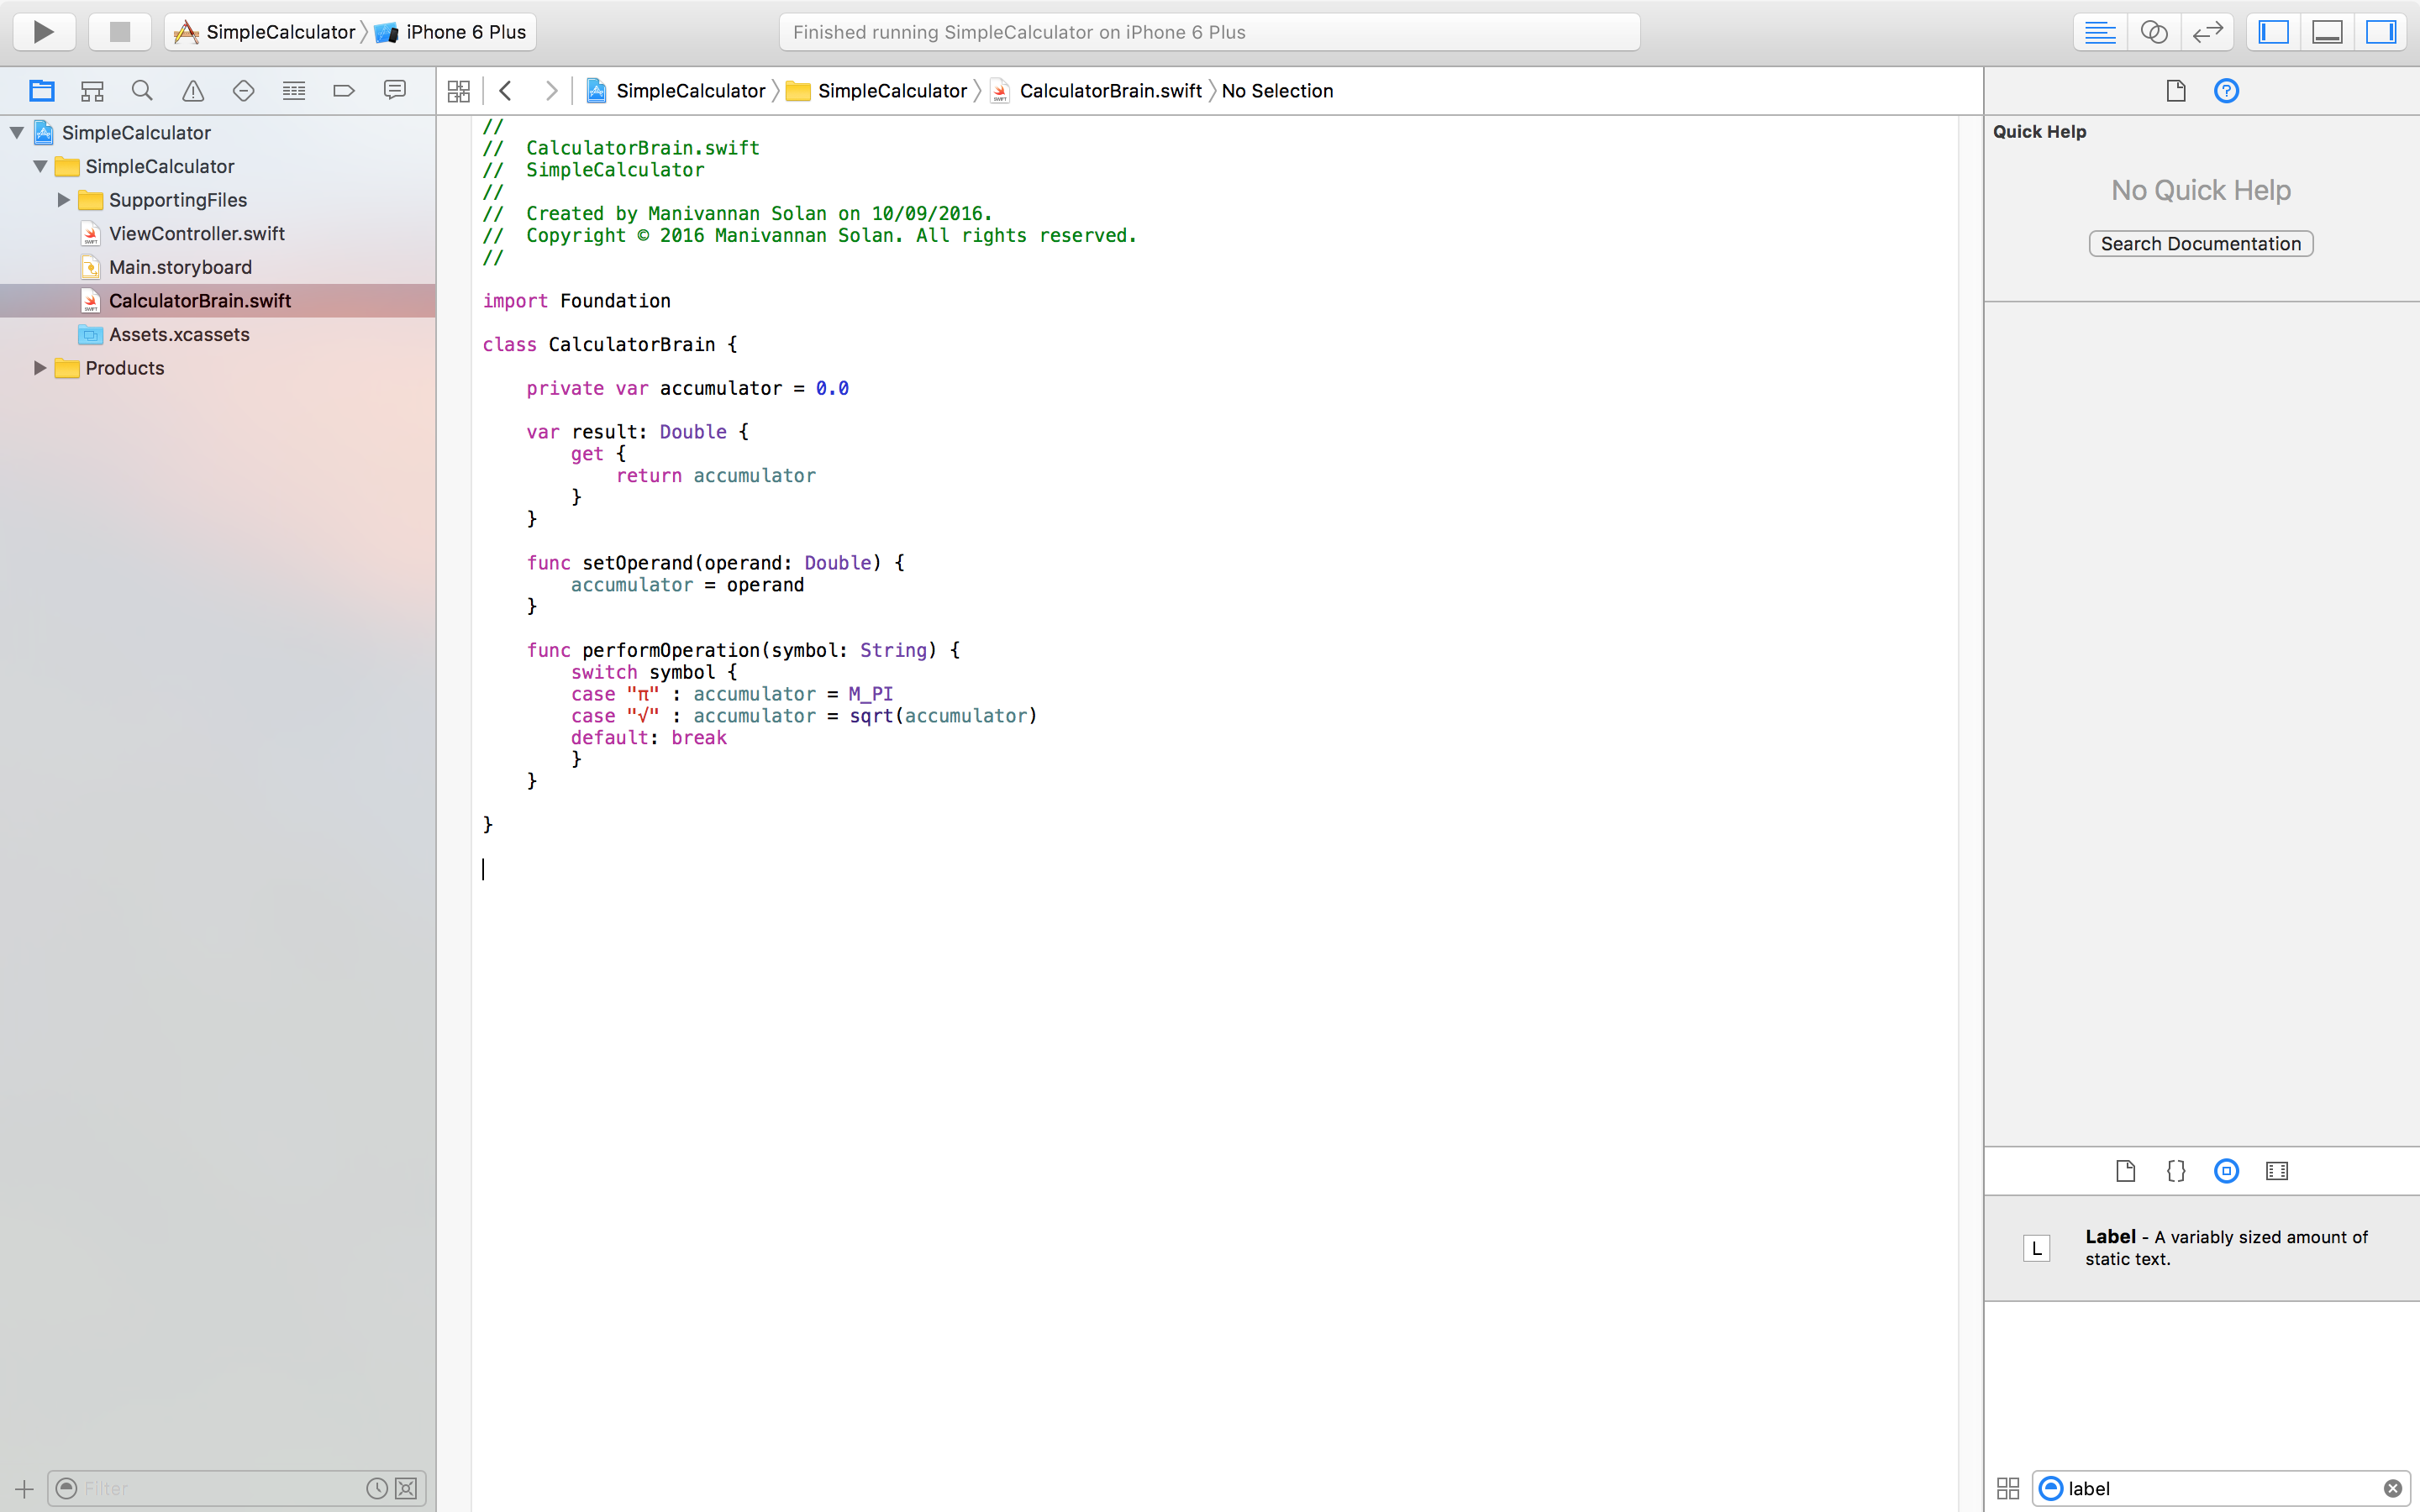 Figure 10: Updated model class.
However, even the switch statement here has common code that we can factor out. Maybe it would be a good idea to index into a dictionary to find out what to do with each mathematical symbol? Figure 11 shows the addition of a dictionary, and replaced performOperation with some simple code to index into the dictionary. You see the error highlighted? The reason for it becomes clear when you think about optionals. What happens if you can't find the value when indexing into the dictionary? We need to have an exclamation mark at the end to denote this scenario. However, our app would crash in the case where we cannot find a value in the dictionary. To prevent this, we would need to put this code inside a conditional.
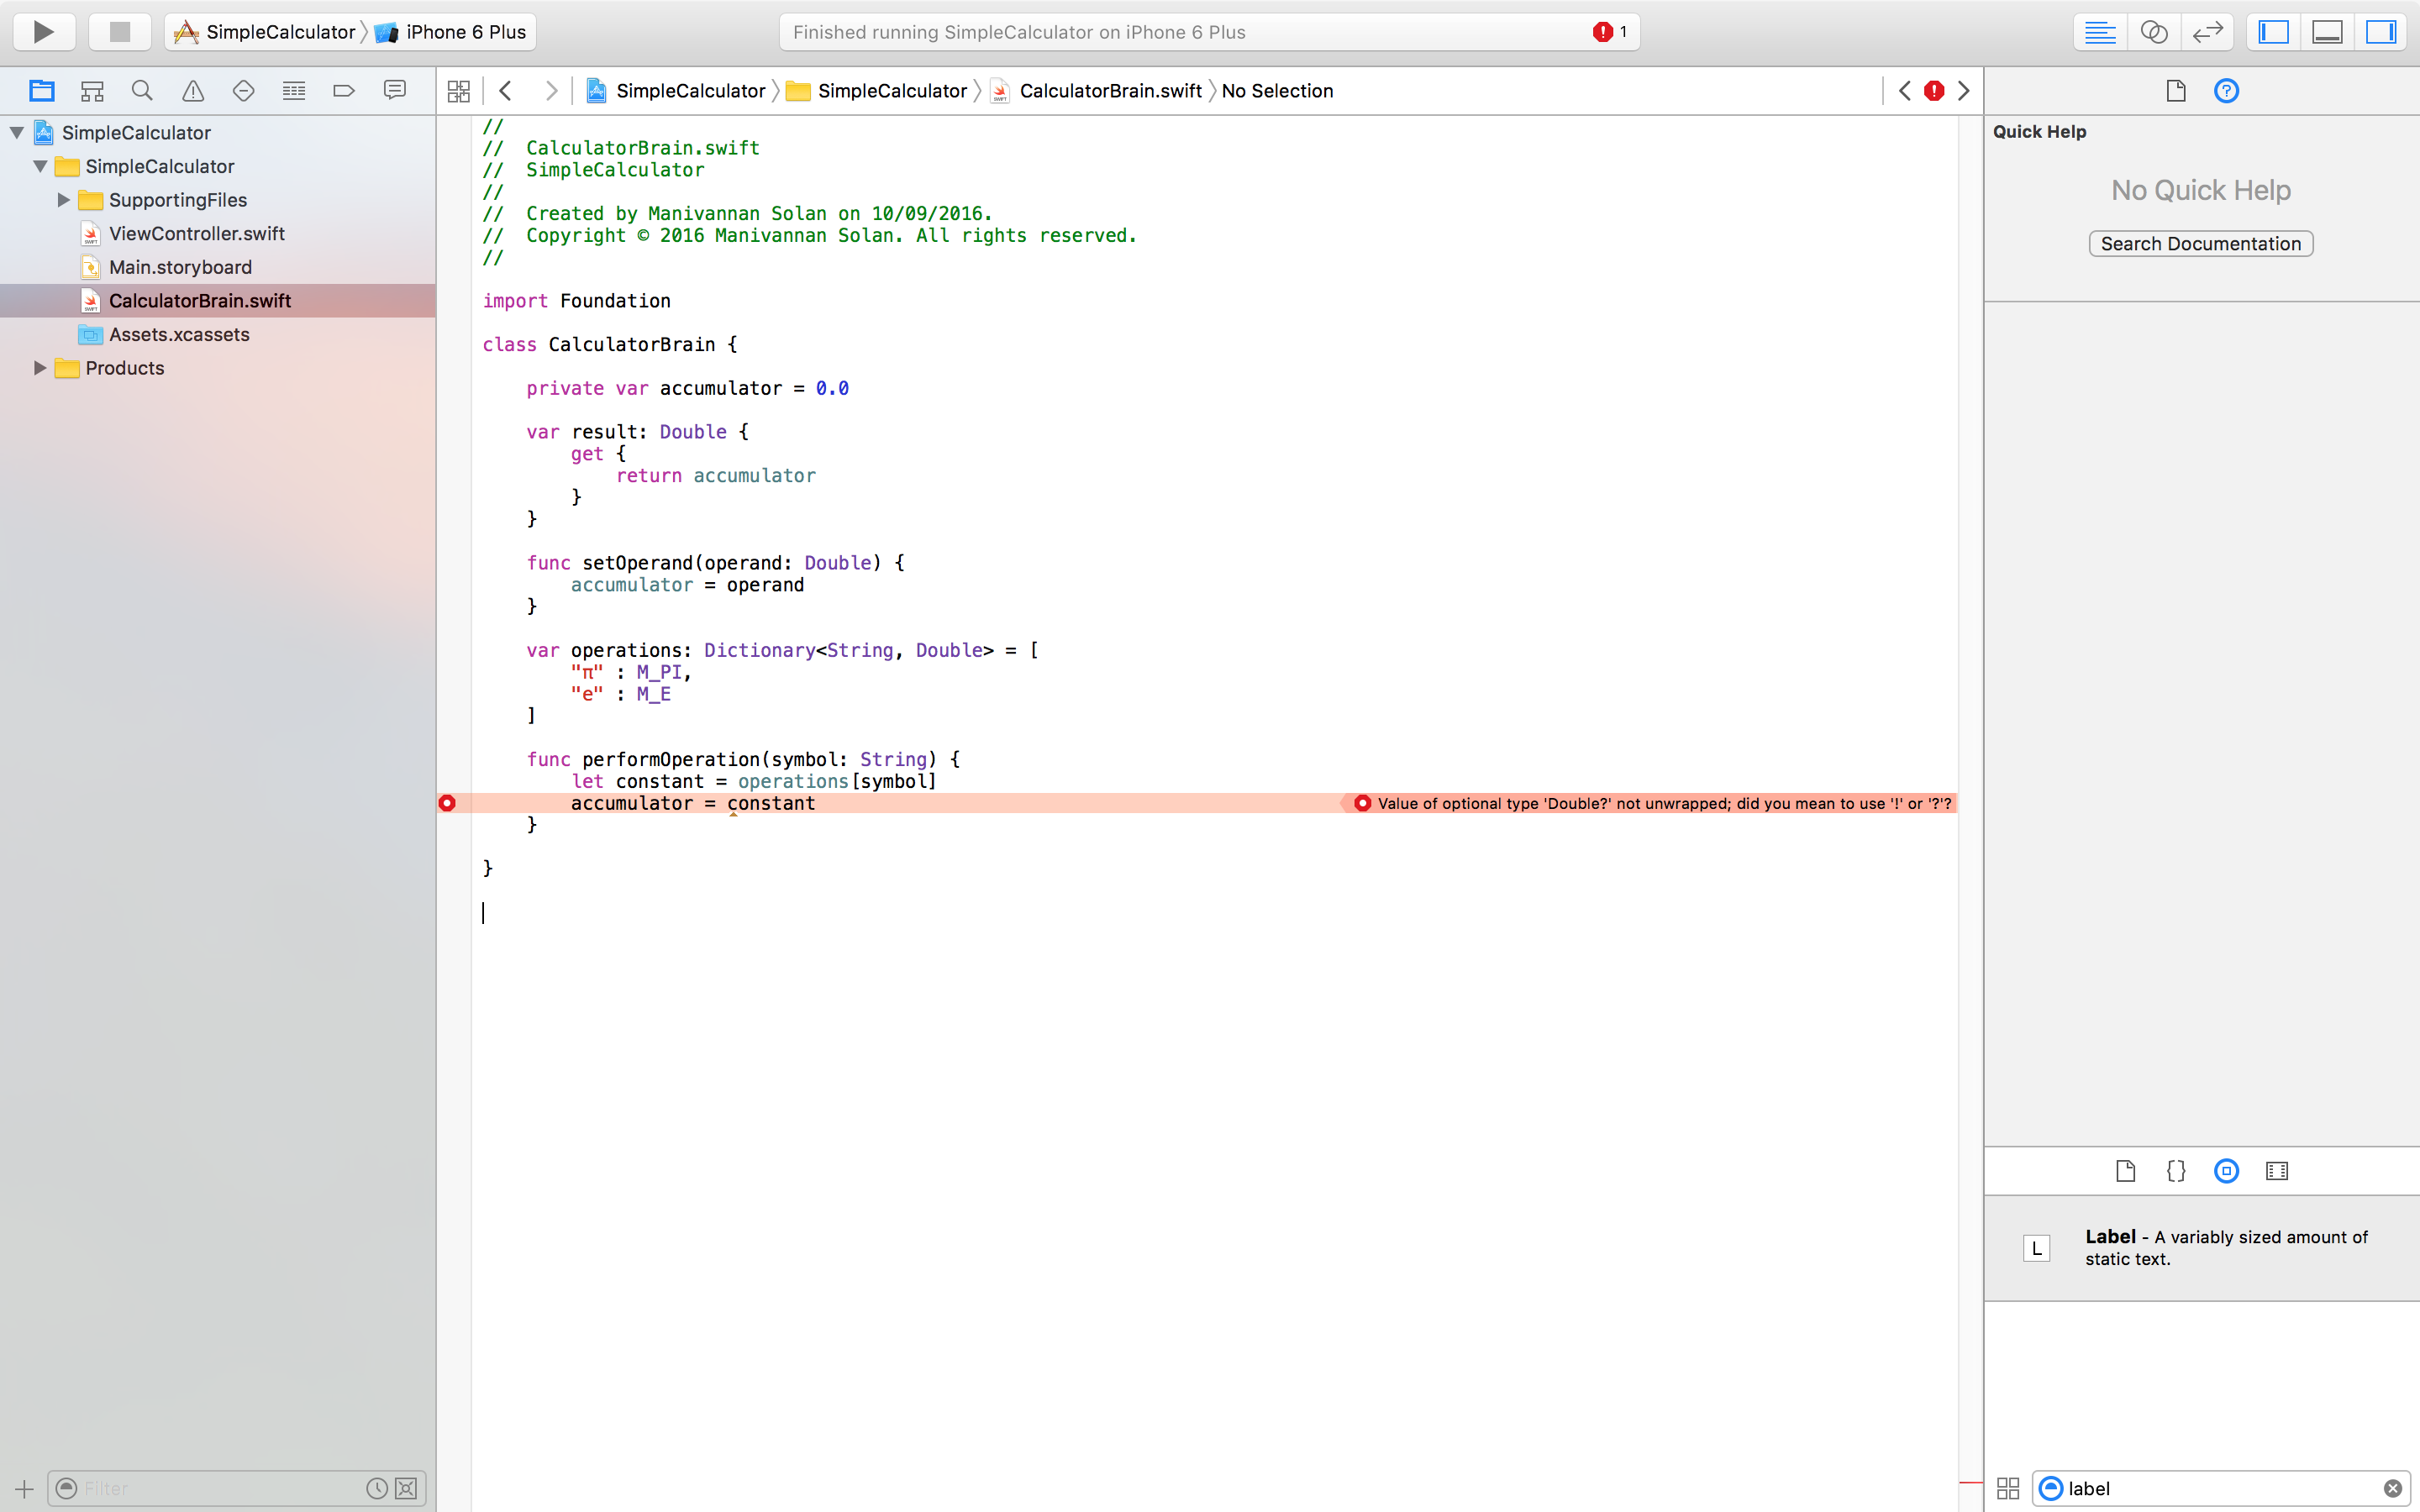 Figure 11: Using a dictionary for mathematical symbols.
For the keen eyed people, you may have noticed that I have replaced square root with the mathematical 'e'. Why? Well we made the dictionary return Doubles, but what can we return for a square root? There are a variety of mathematical symbols and they all have their own cases. We need some way of defining all these cases as one thing - in this scenario using an enum would be best.
enum Operation {
	case: Constant(Double)
	case: UnaryOperation((Double)->Double)
	// More cases to be added
}
So here we are saying that Operation can either be a Constant with an associated value of type Double or a UnaryOperation whose associated value seems arcane. Essentialy, the associated value for UnaryOperation is a function that has one argument of type Double and returns a value of type Double. This is the same syntax used in function definitions, however, we are yet to have created a function as such, which is probably why it looked confusing at first sight.
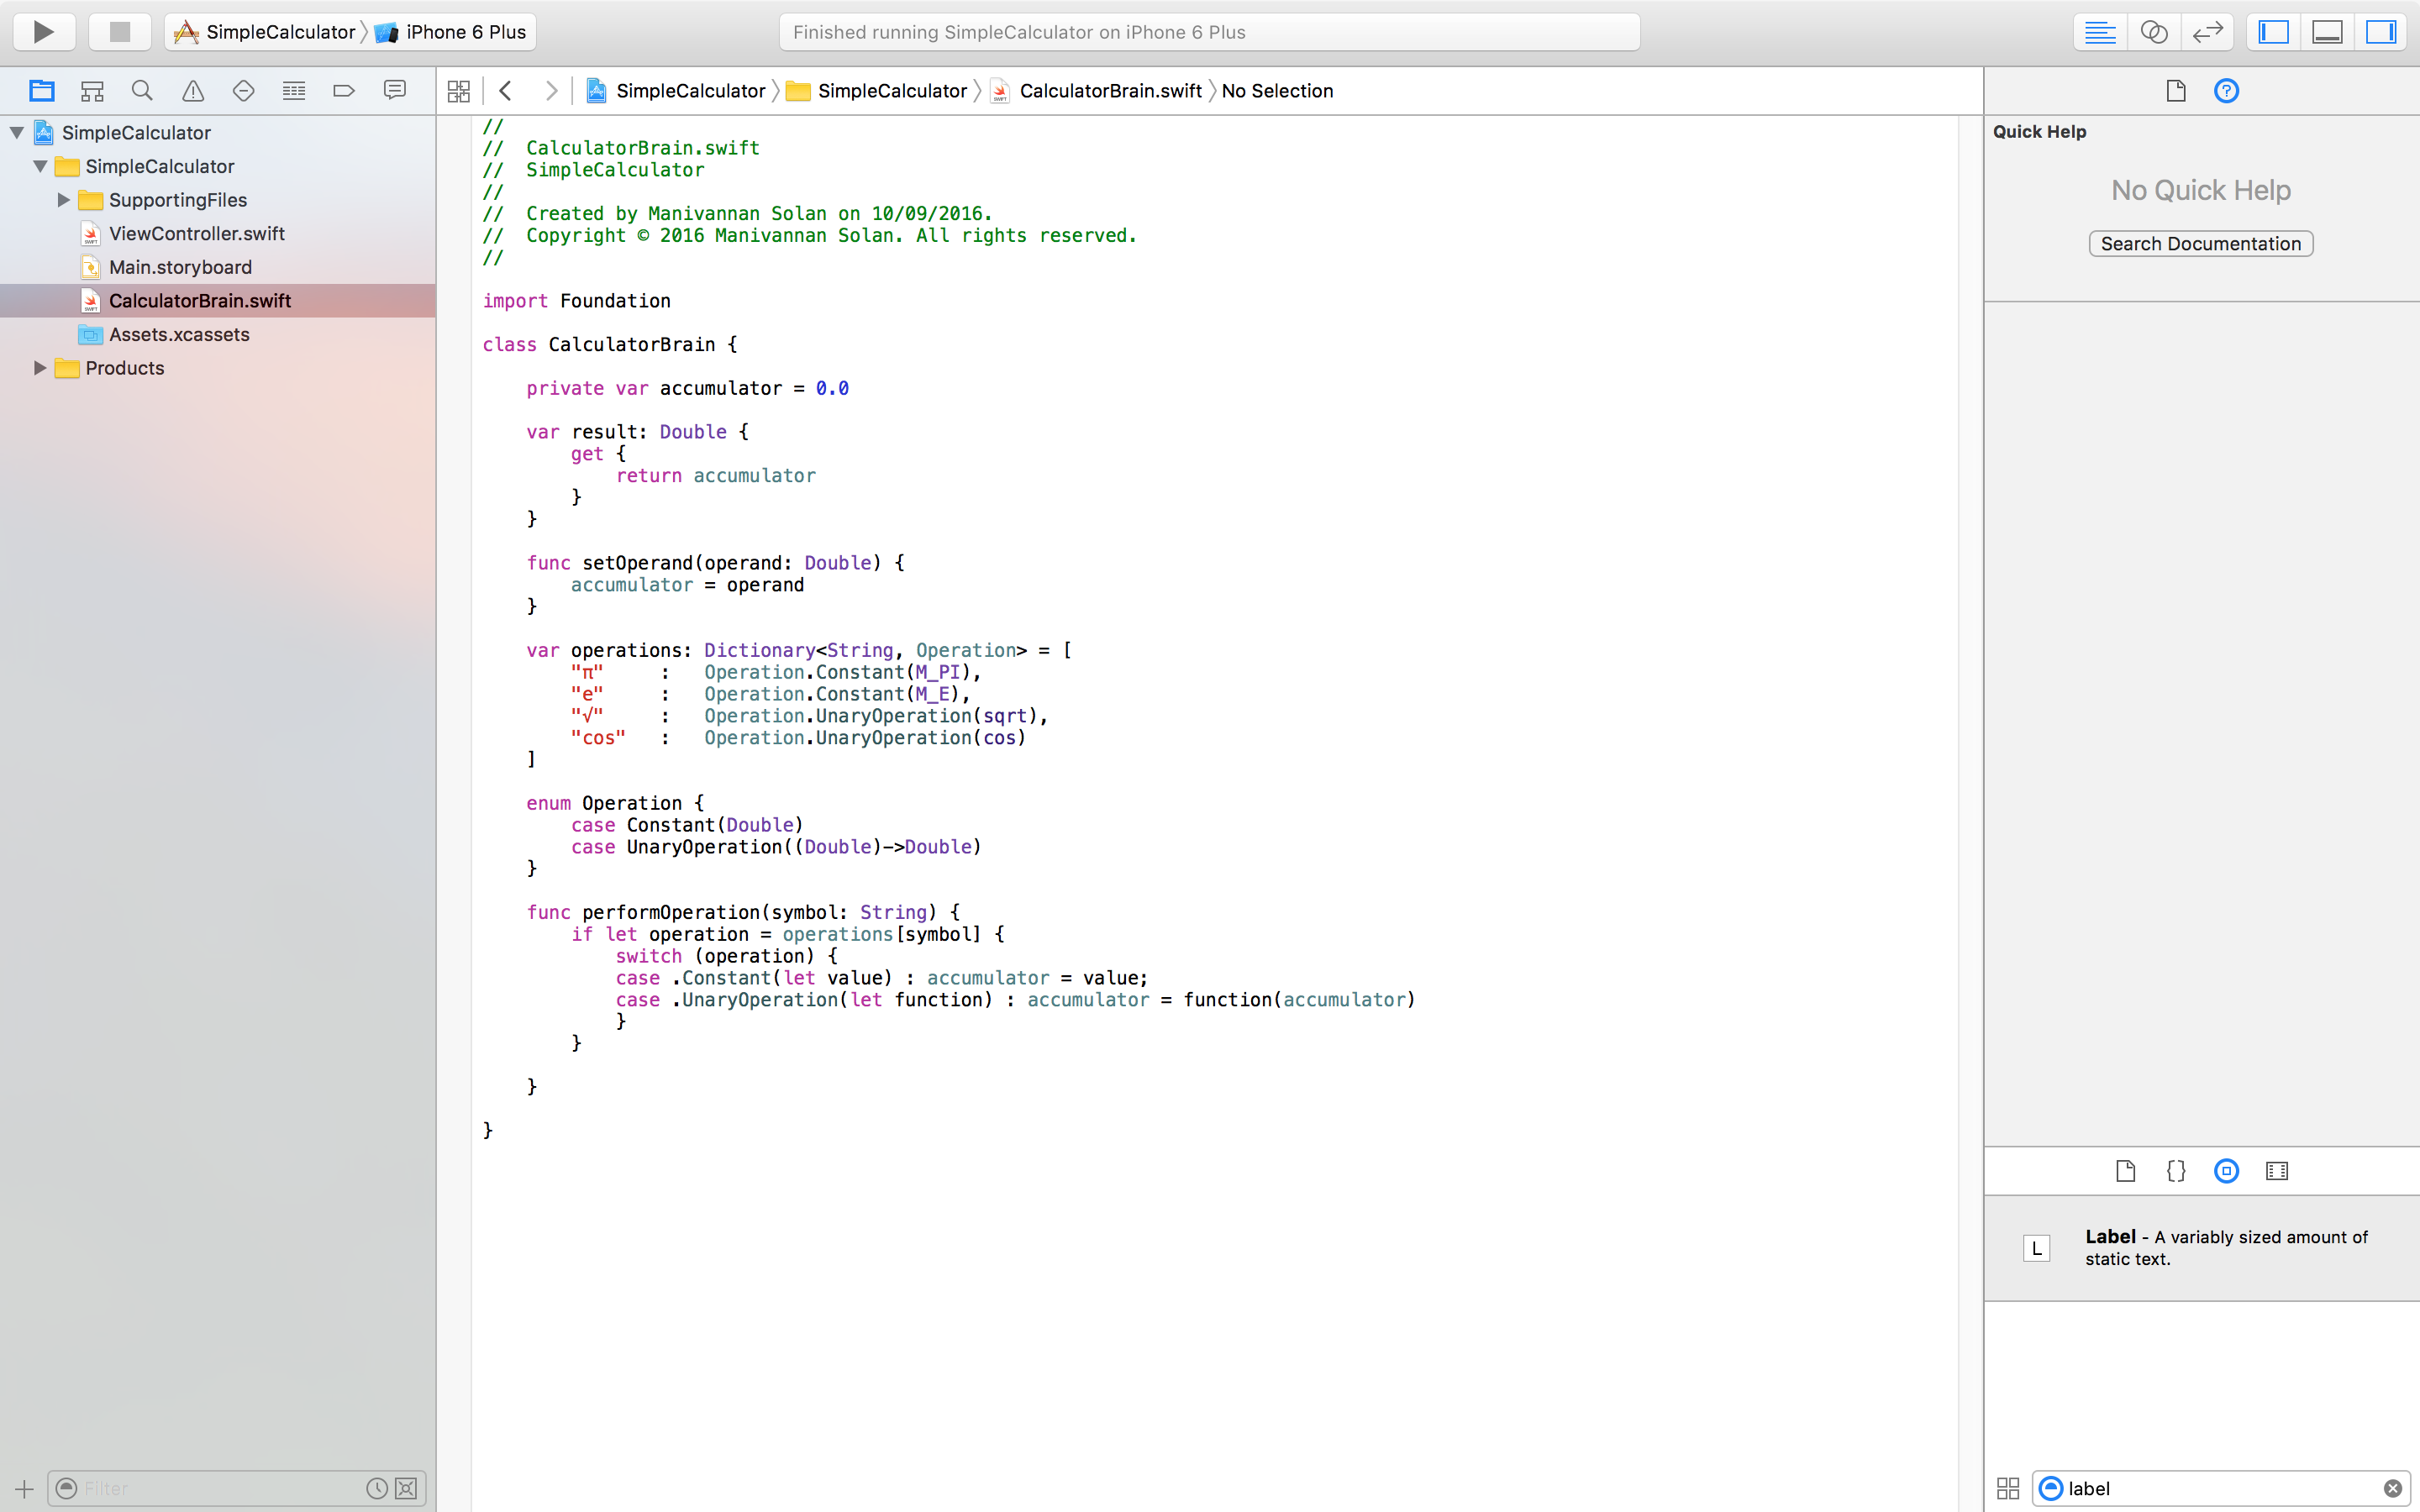 Figure 12: Updated code using enum Operation.
Figure 12 shows the updated code. The syntax should be fairly simple to get to grips with when referring to enums. However, there is one small point to highlight whether to refer to enums as .Constant or Operation.Constant. For me personally, I prefer the latter to make things clearer - though both are possible through inferred typing in the appropriate place. As of writing this post, alt-clicking on the Operation.Constant or .Constant case brings up the wrong documentation. I'm not sure if this is a bug or not, and so it would be sensible to use Operation.Constant to make things clear. Furthermore, we can assign a constant/variable to the associated value of the enum inside the switch statement quite easily.
What about binary operations? Well this is slightly more complicated as we need to rememeber the first operand of the operation. We will be creating a struct to keep track of the information we need.
Break: What is a struct?
Structs are similar to classes except that they are passed by value rather than by reference. This means that a copy of the struct is created rather than using the same struct referenced. However, Swift does have the COW (copy-on-write) optimisation, which essentially means that a copy is only created if there is a modification. This is too prevent waste of memory, for example in the exaggerated scenario of passing around a 10,000 length array (essentially a struct).
Taking care of binary operations and equals
With a brief overview of what a struct is, we can now create one to store the binary operation and the first operand.
private var pending: PendingBinaryOperationInfo?

struct PendingBinaryOperationInfo {
	var binaryOperation: ((Double, Double)->Double)
	var firstOperand: Double
}
Having spoken about function syntax before, you should have an idea for what the type of binaryOperation is. It's basically a function that takes two Double's as arguments and returns a Double. Remember the use of optional for the times when we aren't carrying out a binary operation. One more thing, the default constructor for a struct takes in arguments to initialise all variables in the struct. This is in contrast to the default constructor of a class, which has no arguments. Figure 13 shows the updated code for binary operation - although you may like to try updating your version before having a look. Remember you need to update the enum declaration and the performOperation function as well as including the code above.
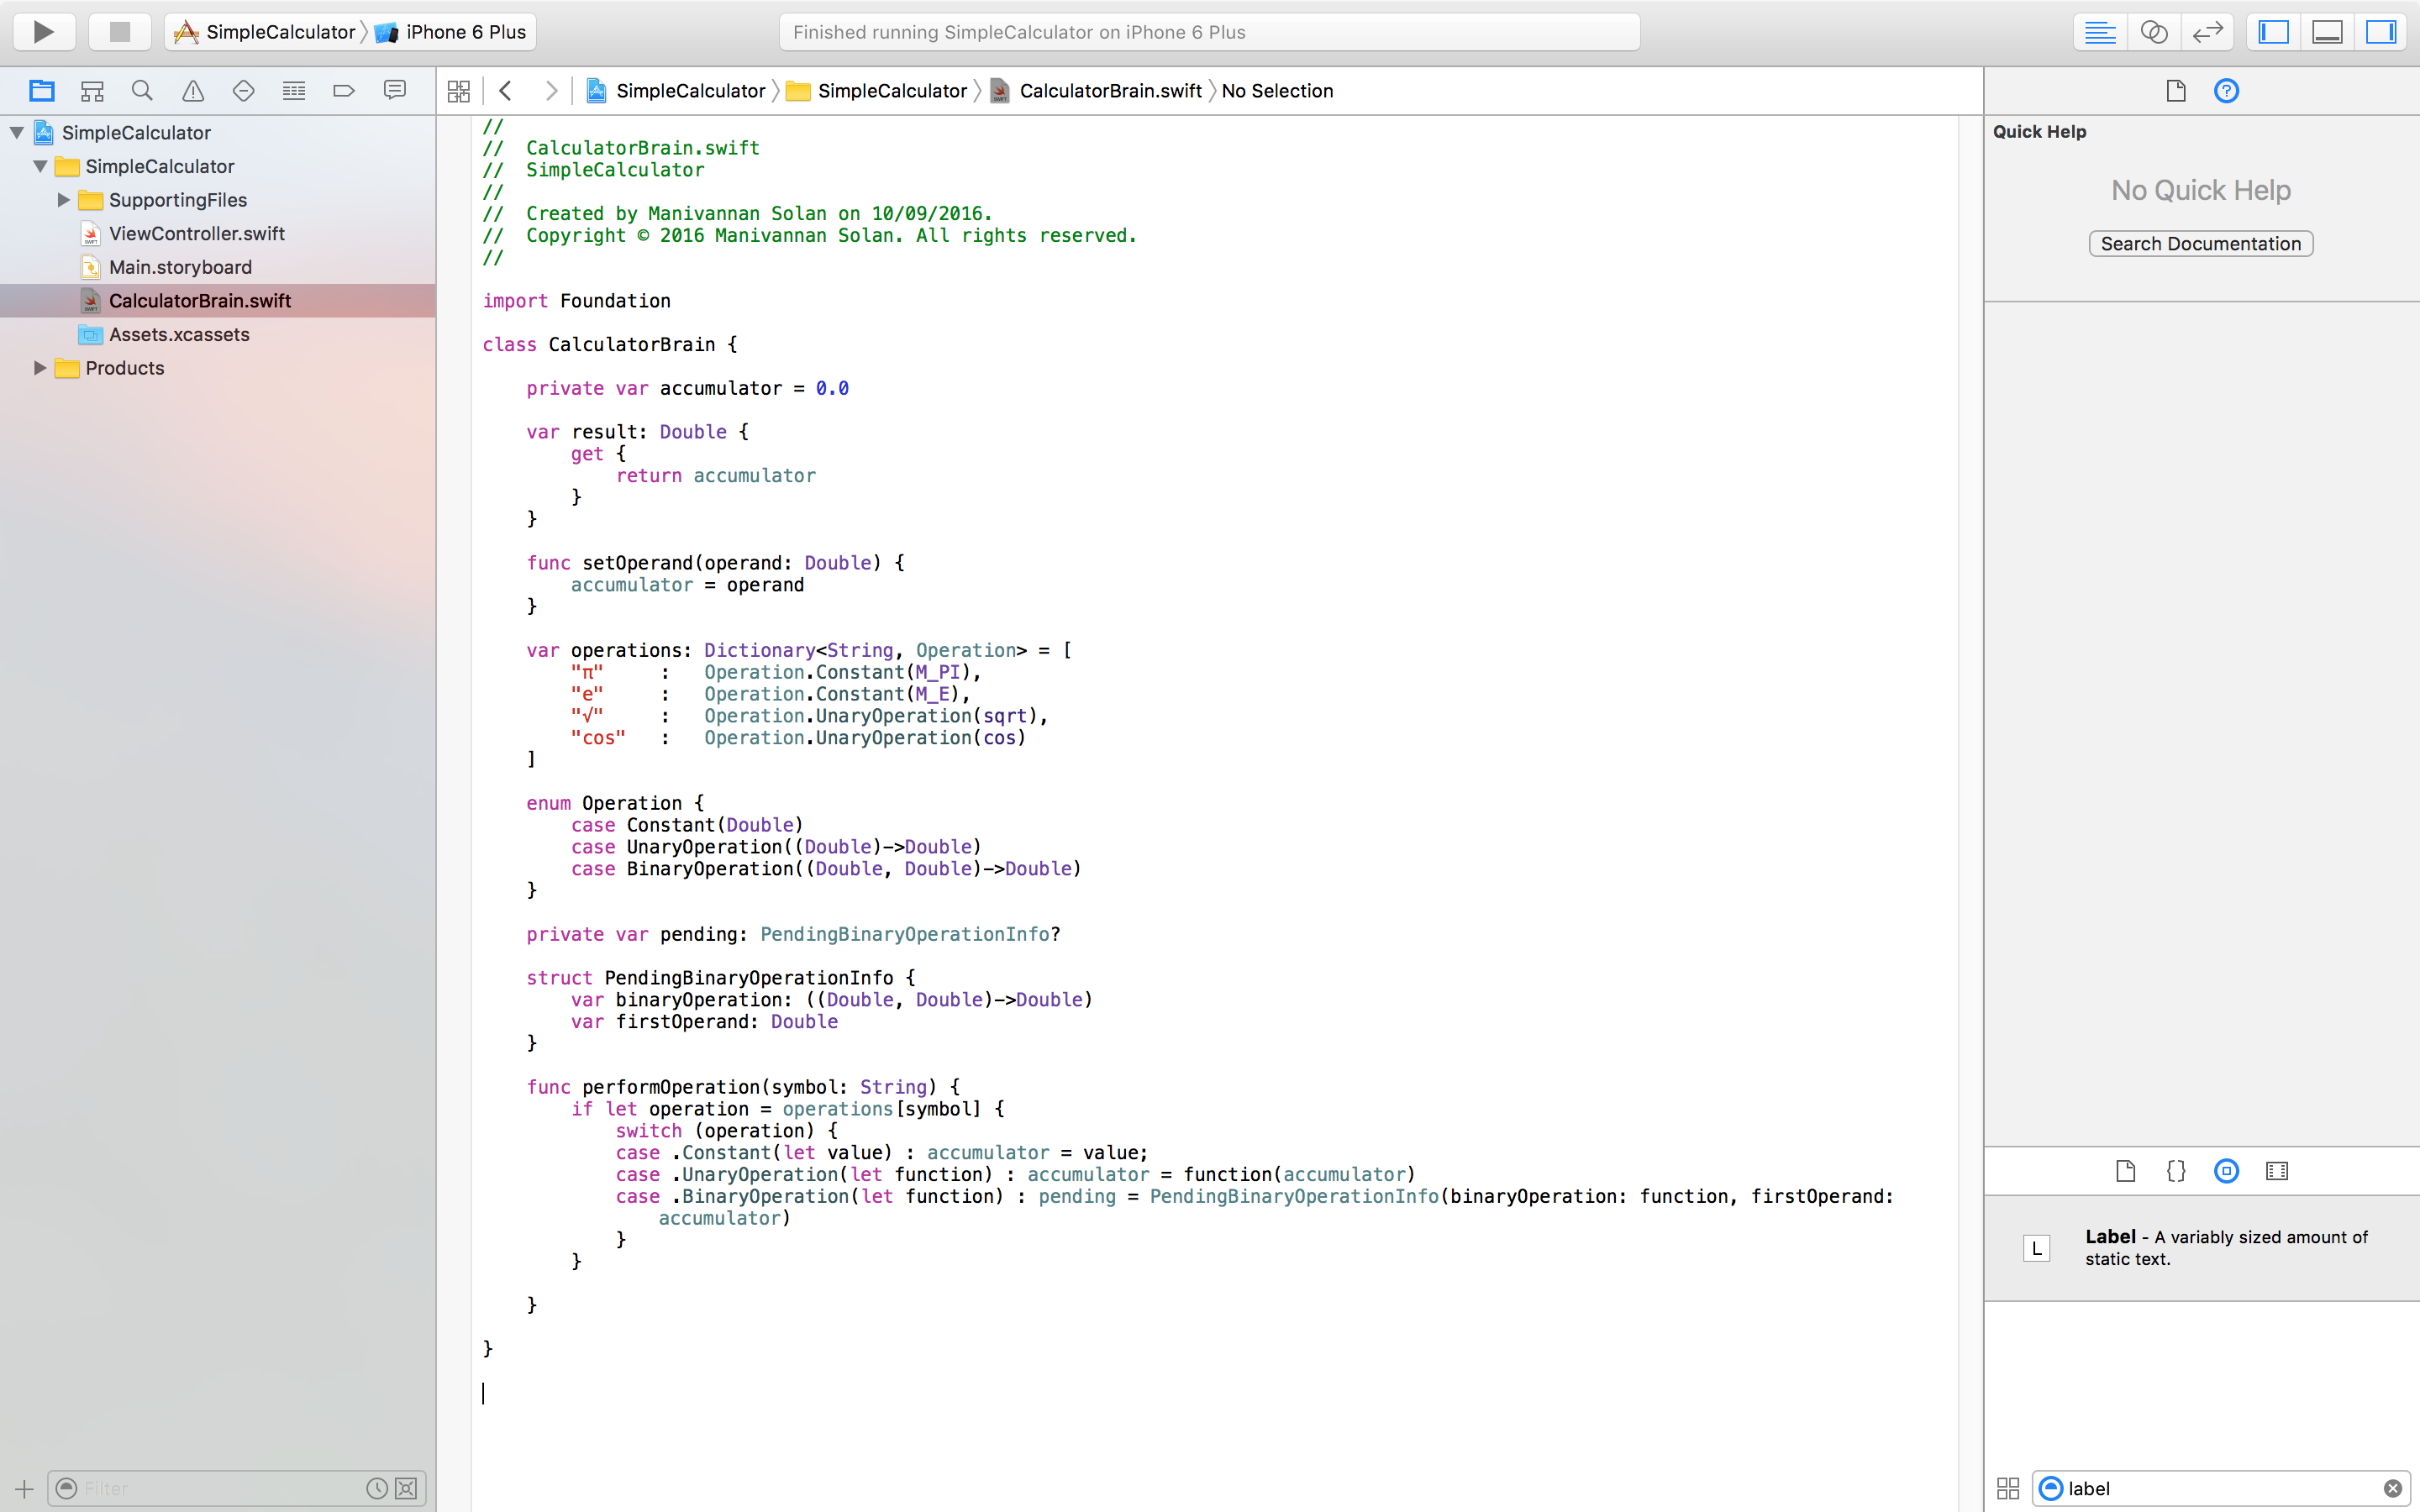 Figure 13: Updated model for binary operation.
However, we still need to add a binary operation to our dictionary. It's not as simple as sqrt or cos because binary functions such as multiply are not defined using word's as it is simply an asterisk, but we cannot use that here. We need to define a new function for each case (multiply, divide, addition, subtraction), and it would be tedious to do this the usual way i.e. function multiply((Double, Double)->Double)...
There are a few ways to do this using anonymous functions - functions that don't have a name, and are simply defined on the fly. Pick one that suits your style. Before I had seen this, I was used to the first two definitions. However, the last two definitions are quite nice, and really take advantage of Swift's inferred typing system.
var operations: Dictionary<String, Operation> = [
        ...
        ...
        "x"	: Operation.BinaryOperation({ (op1: Double, op2: Double) -> Double in return op1 * op2 })
        // or
        "x"	: Operation.BinaryOperation({  (op1, op2) in return op1 * op2 })
        // or
        "x"	: Operation.BinaryOperation({ return $0 * $1 })
        // or
        "x"	: Operation.BinaryOperation({ $0 * $1 })
    ]
Tip: When adding multiplication to the dictionary make sure to use the correct symbol found using the Edit>Emoji&Symbol menu. Now to finish things off we need an equals button. The equals is another mathematical symbol, but it does not fit into the categories we currently have in our enum. When adding the necessary code for performOperation think about when the equals button is used on a calculator. Have a go yourself, and then refer to Figure 14 for the updated code.
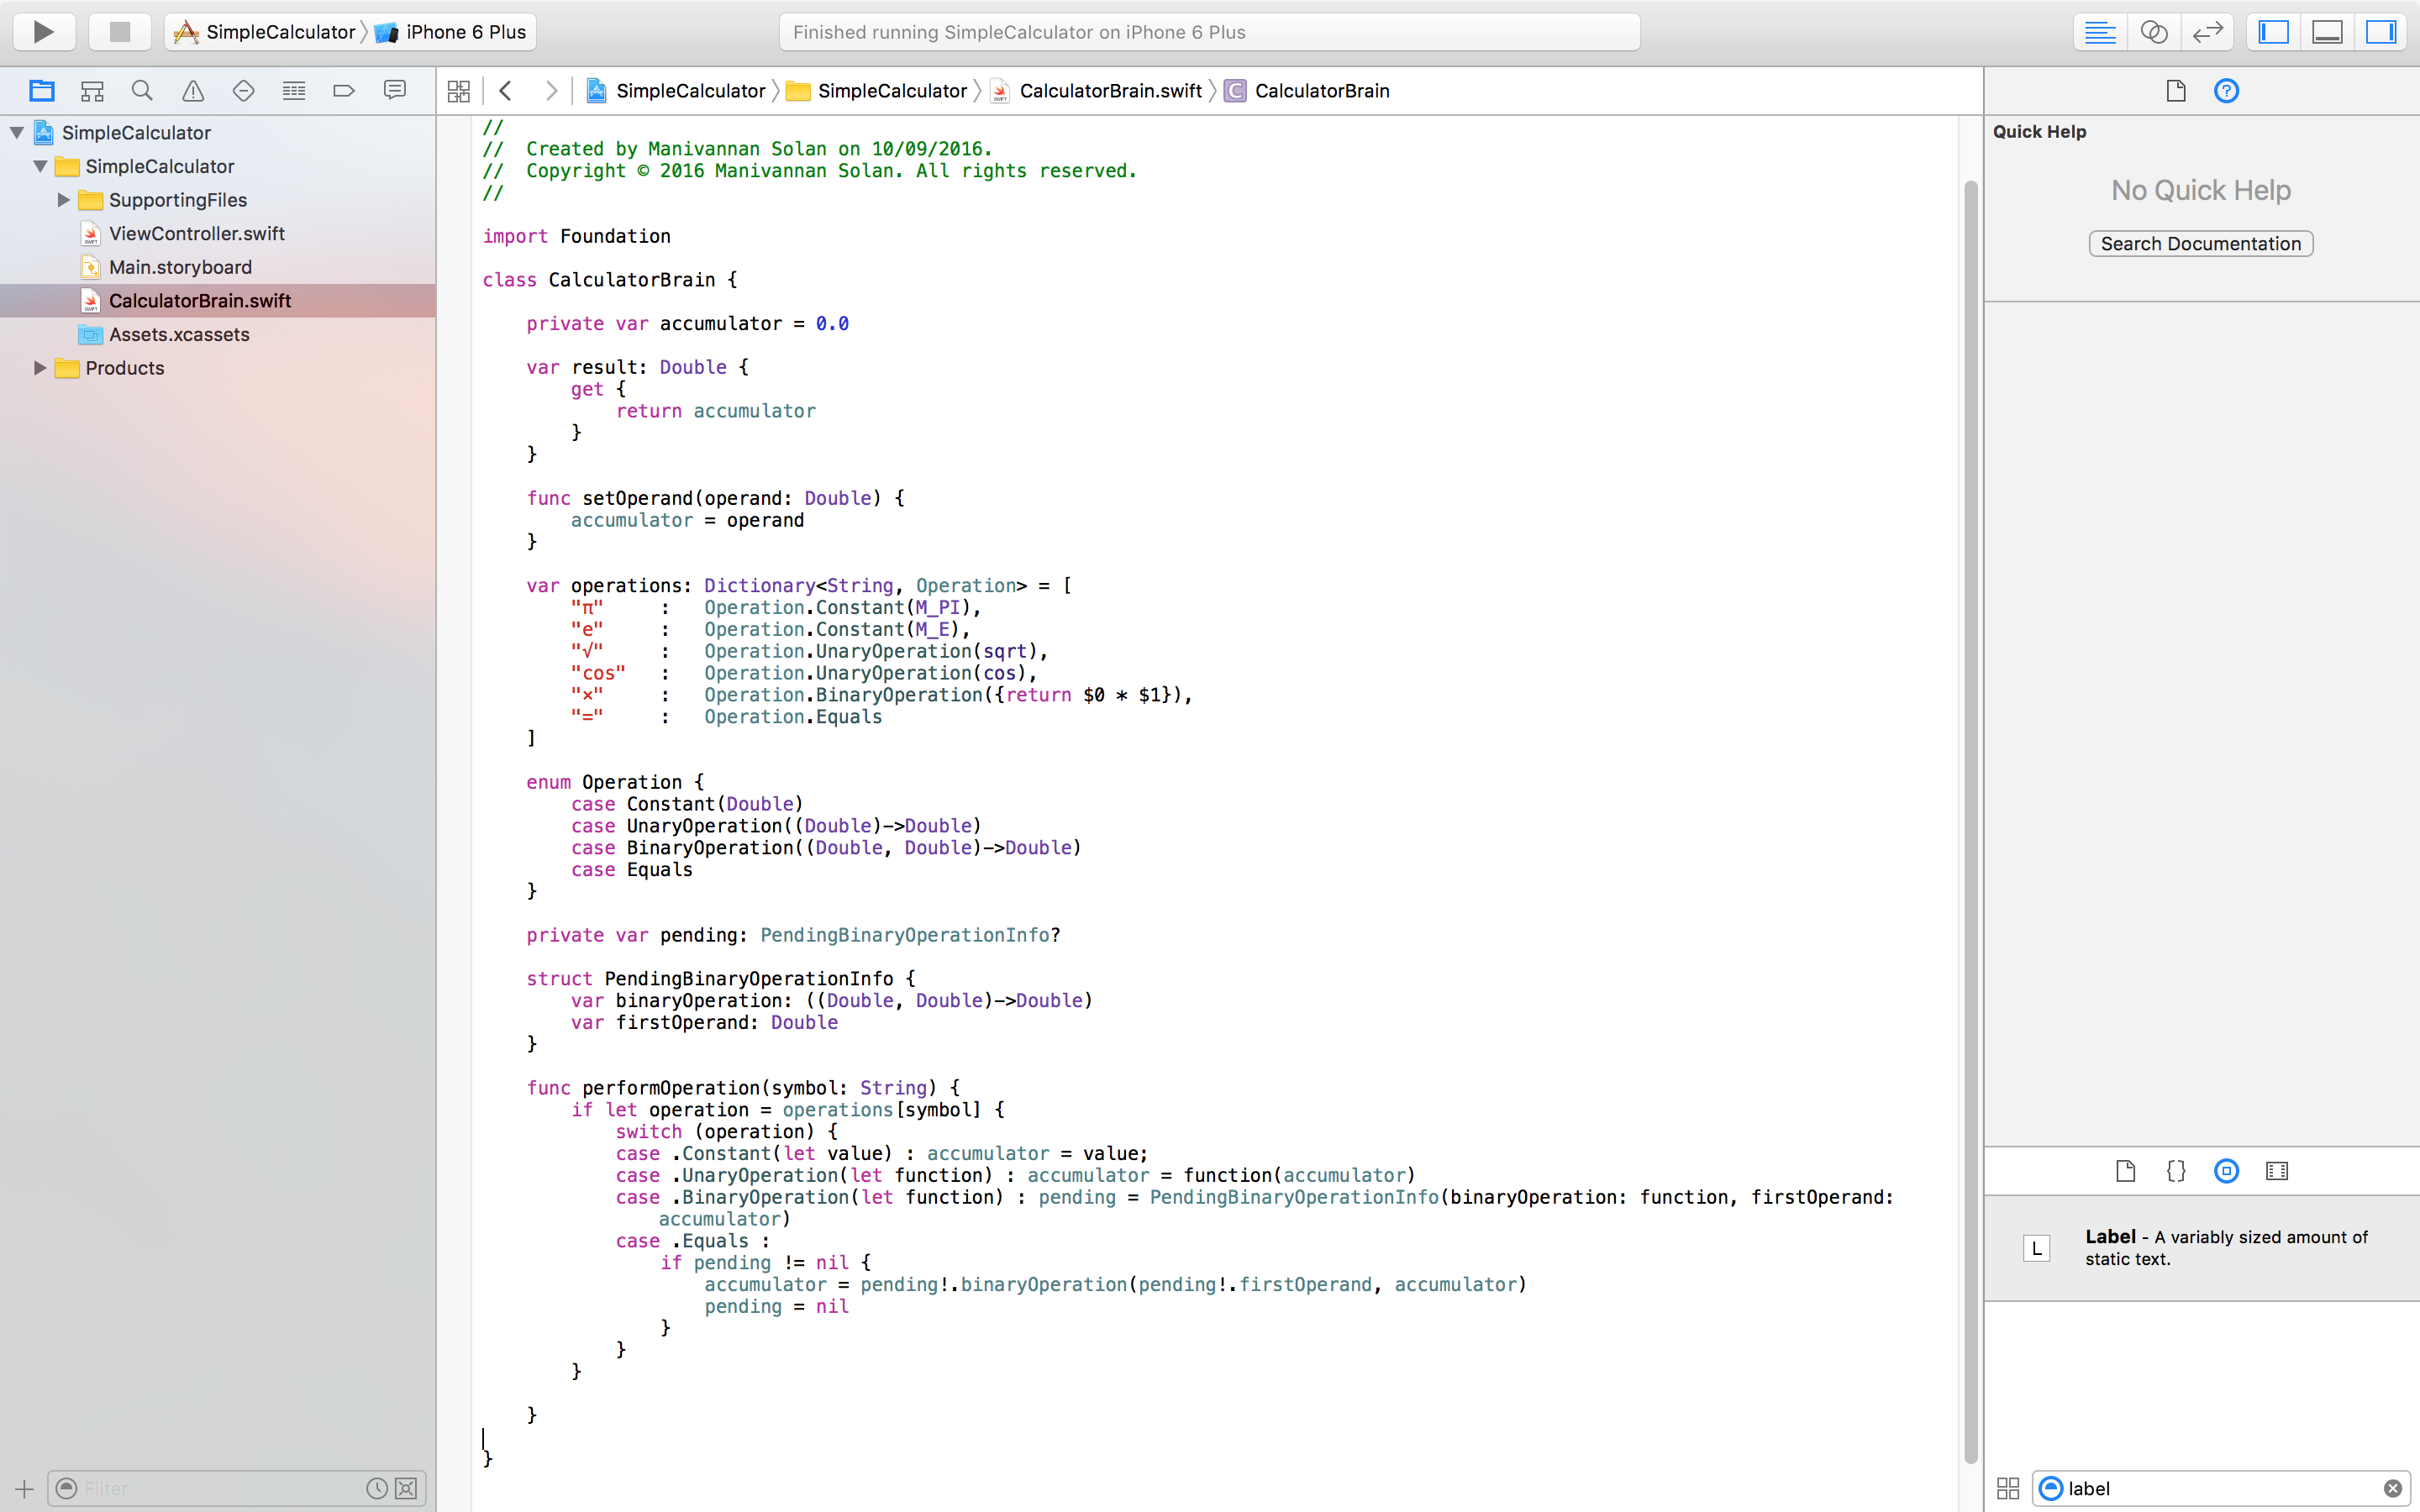 Figure 14: Updated code for equals button.
Now would be a good time to test our application (if you haven't already done so) - I haven't suggested it throughout this post, but maybe you used your intuition. However, before we can, we need to add some more buttons to our storyboard for constants, unary operations, binary operations and equals. This can be done by copying and pasting a button that is currently linked to performOperation and replacing the text inside. It's this simple because we followed the MVC paradigm and our code is designed to be extensible.
If you have played around for long enough with your application, then you may have noticed that you cannot do repeated binary operations e.g. 7 * 7 * 7 * 7 = 49. This is because our binary operation doesn't check if the pending struct is currently being used, and act accordingly - similar code for what we want is seen for the equals button case in performOperation. Therefore, what we can do is factor out this common code into a function that we can call. Try and do this yourself before looking at the next figure. Think about the visibility of this helper function!
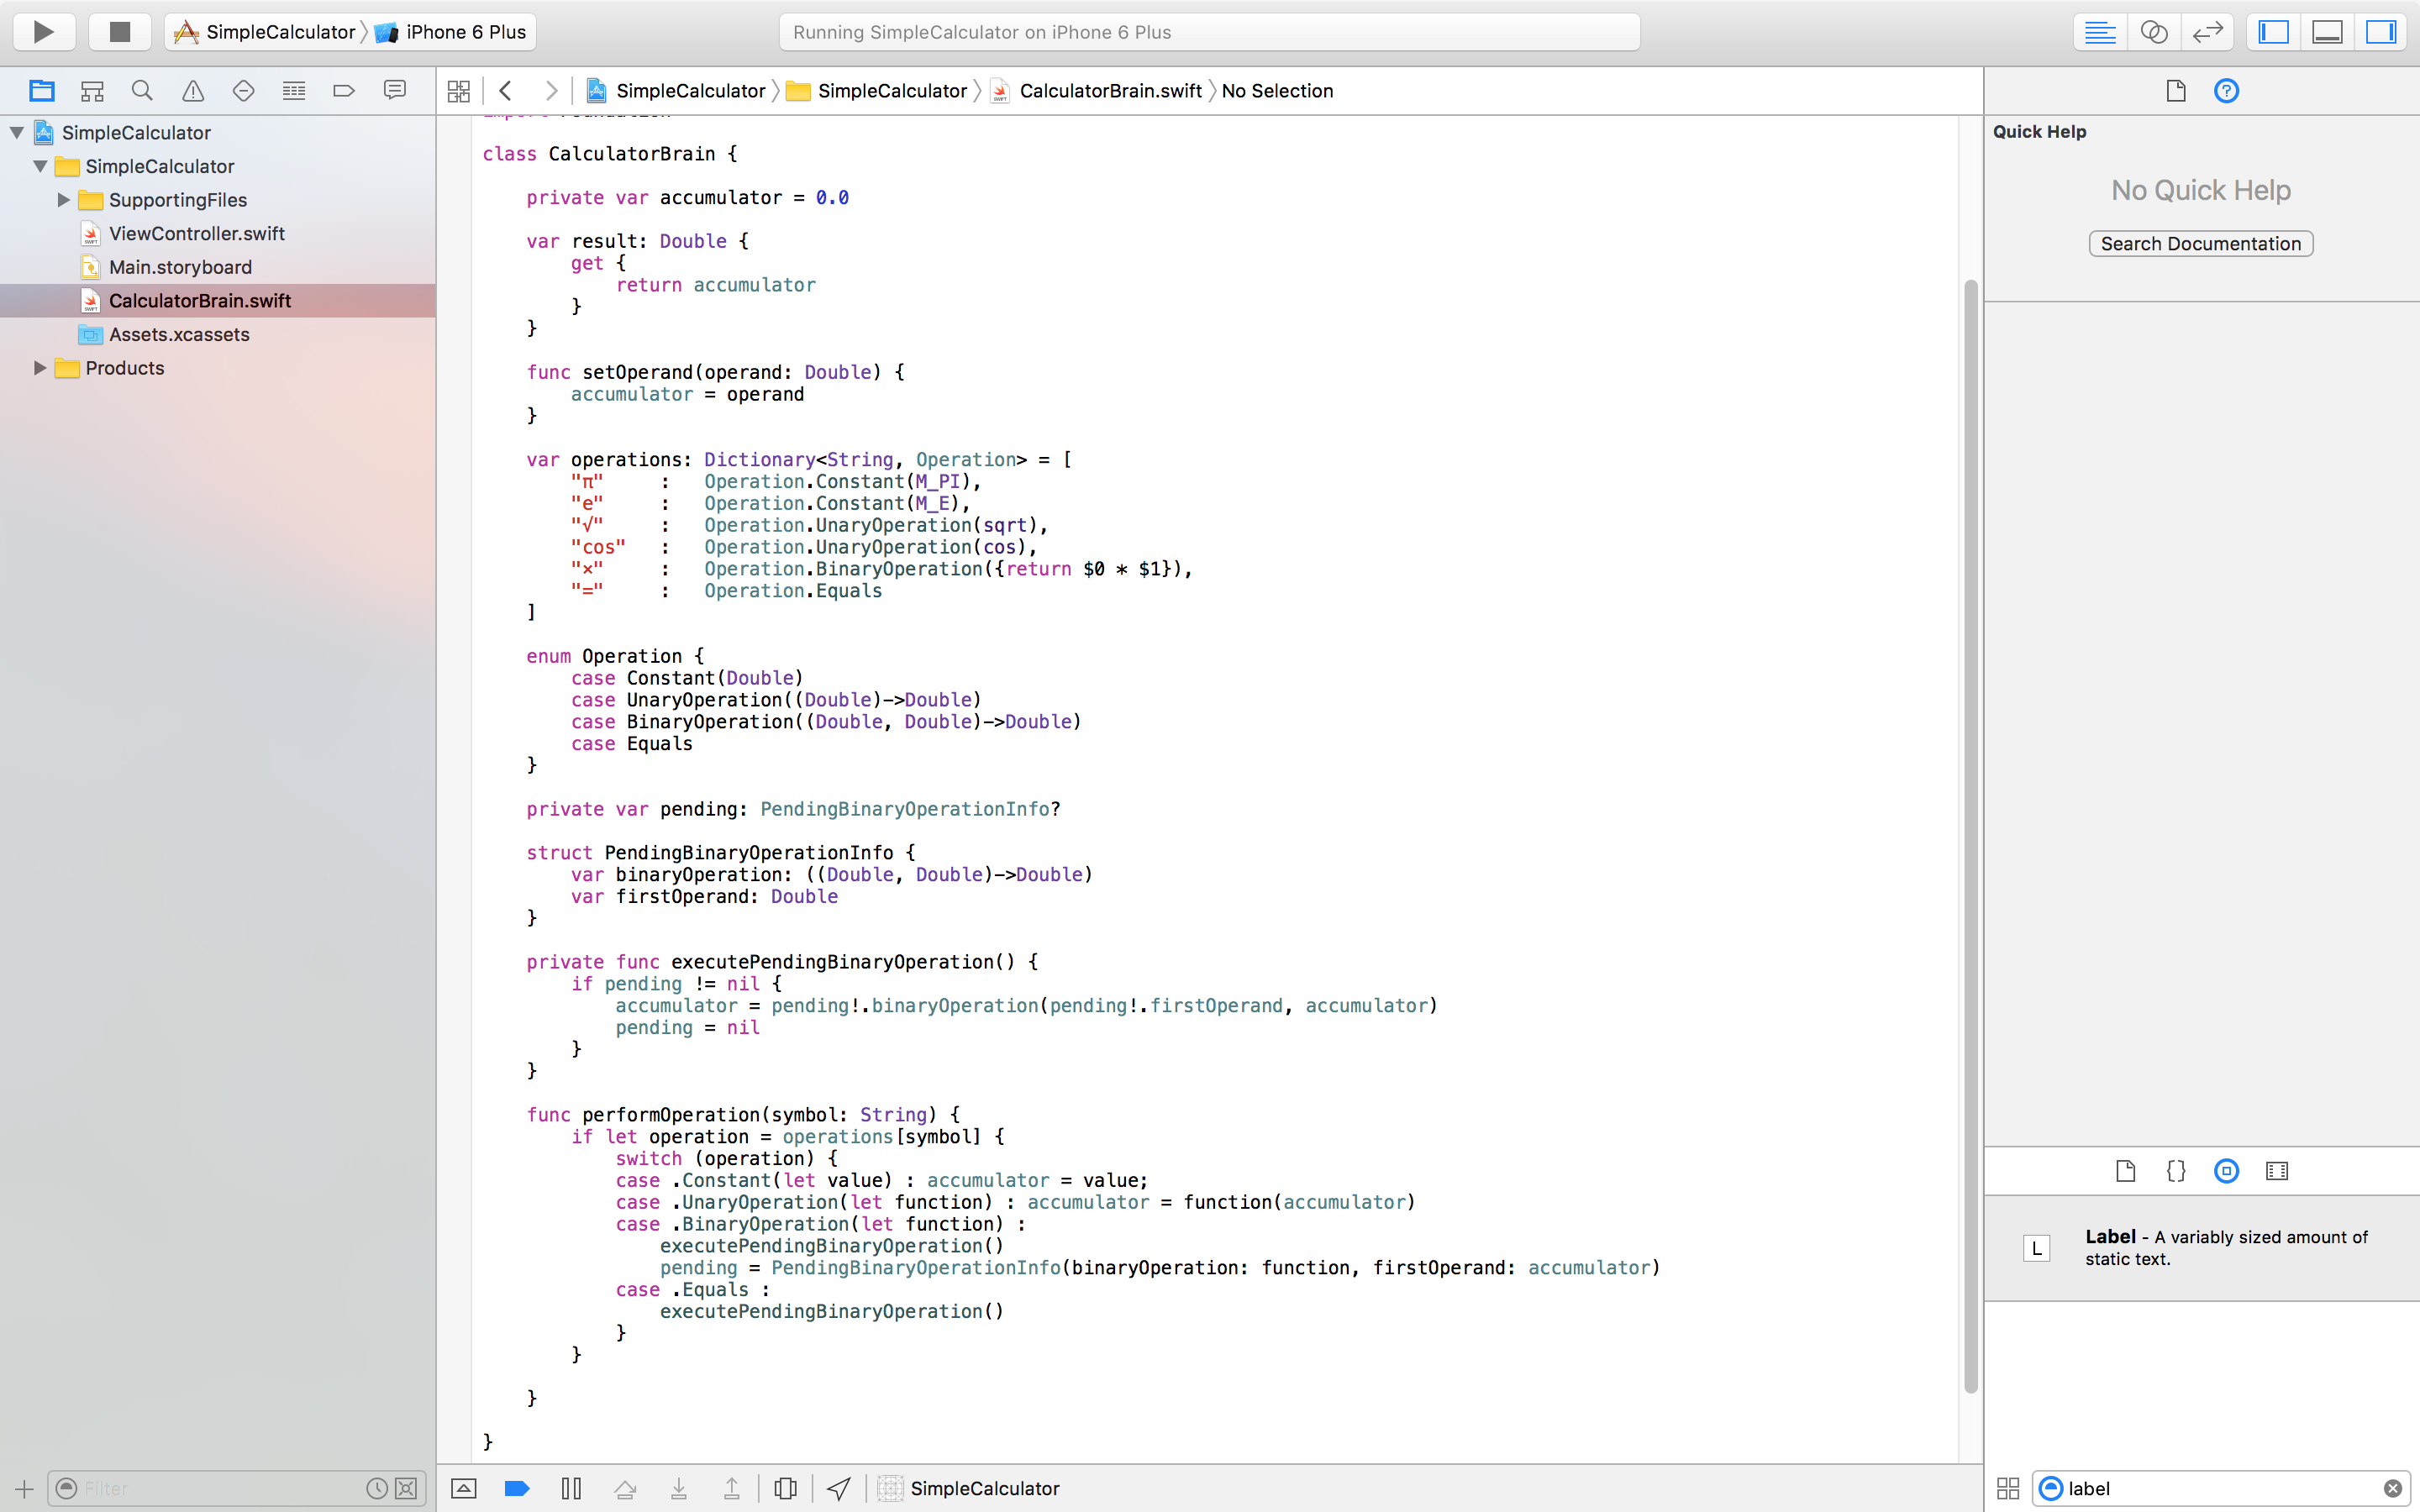 Figure 15: Final updates to the model class.
With that we conclude this episode where we have added a couple of mathematical function buttons to our calculator. The code we have written is extensible, and you should feel comfortable with adding more buttons such as addition, subtraction, sin, cos, tan etc.